
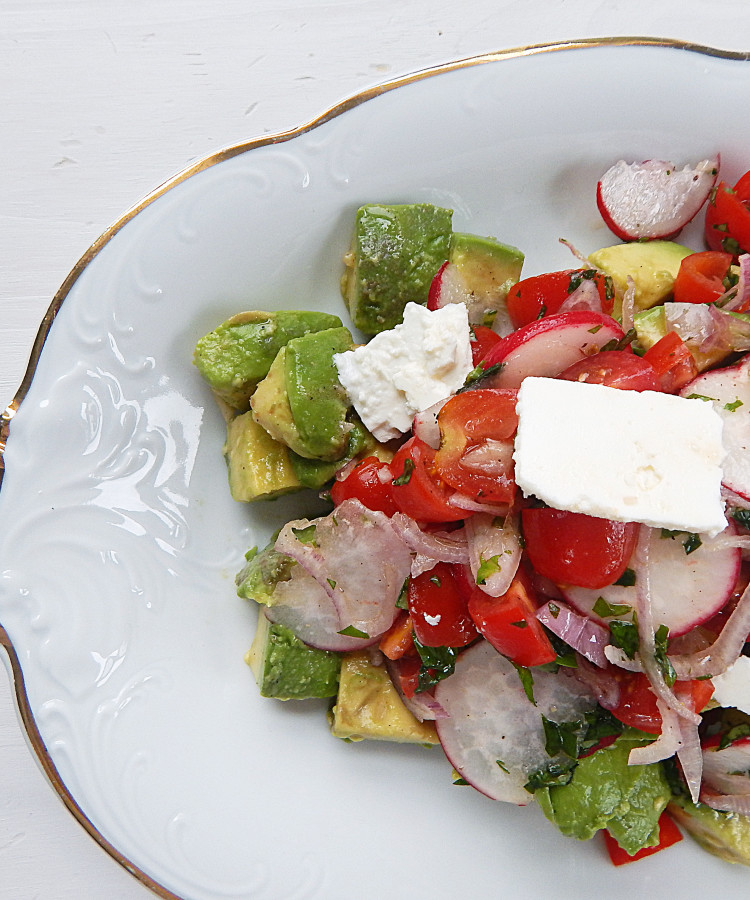
Avocado Salad with Tomato and Radish for Two
I’ve been reading about the health benefits of avocado, in particular an article that stated this; past studies have shown that eating a lot of avocados is associated with lower blood cholesterol. In one study that involved putting people with slightly elevated levels on a diet rich in avocados for just seven days, researchers saw a 17 percent decrease in cholesterol levels. Since my cholesterol is a little elevated I though I’d start adding more avocados to my diet.
There is also a study that avocado has potential cancer fighting properties. Read more about it here. These are all good reasons to add more of this creamy, buttery vegetable to your diet! I decided to make a salad and I didn’t want it lost in a bunch of leafy greens but instead to be the star of the dish. This salad is bursting with nutrients and flavor. The juicy tomatoes and the crunchy radish give it some textural contrast.

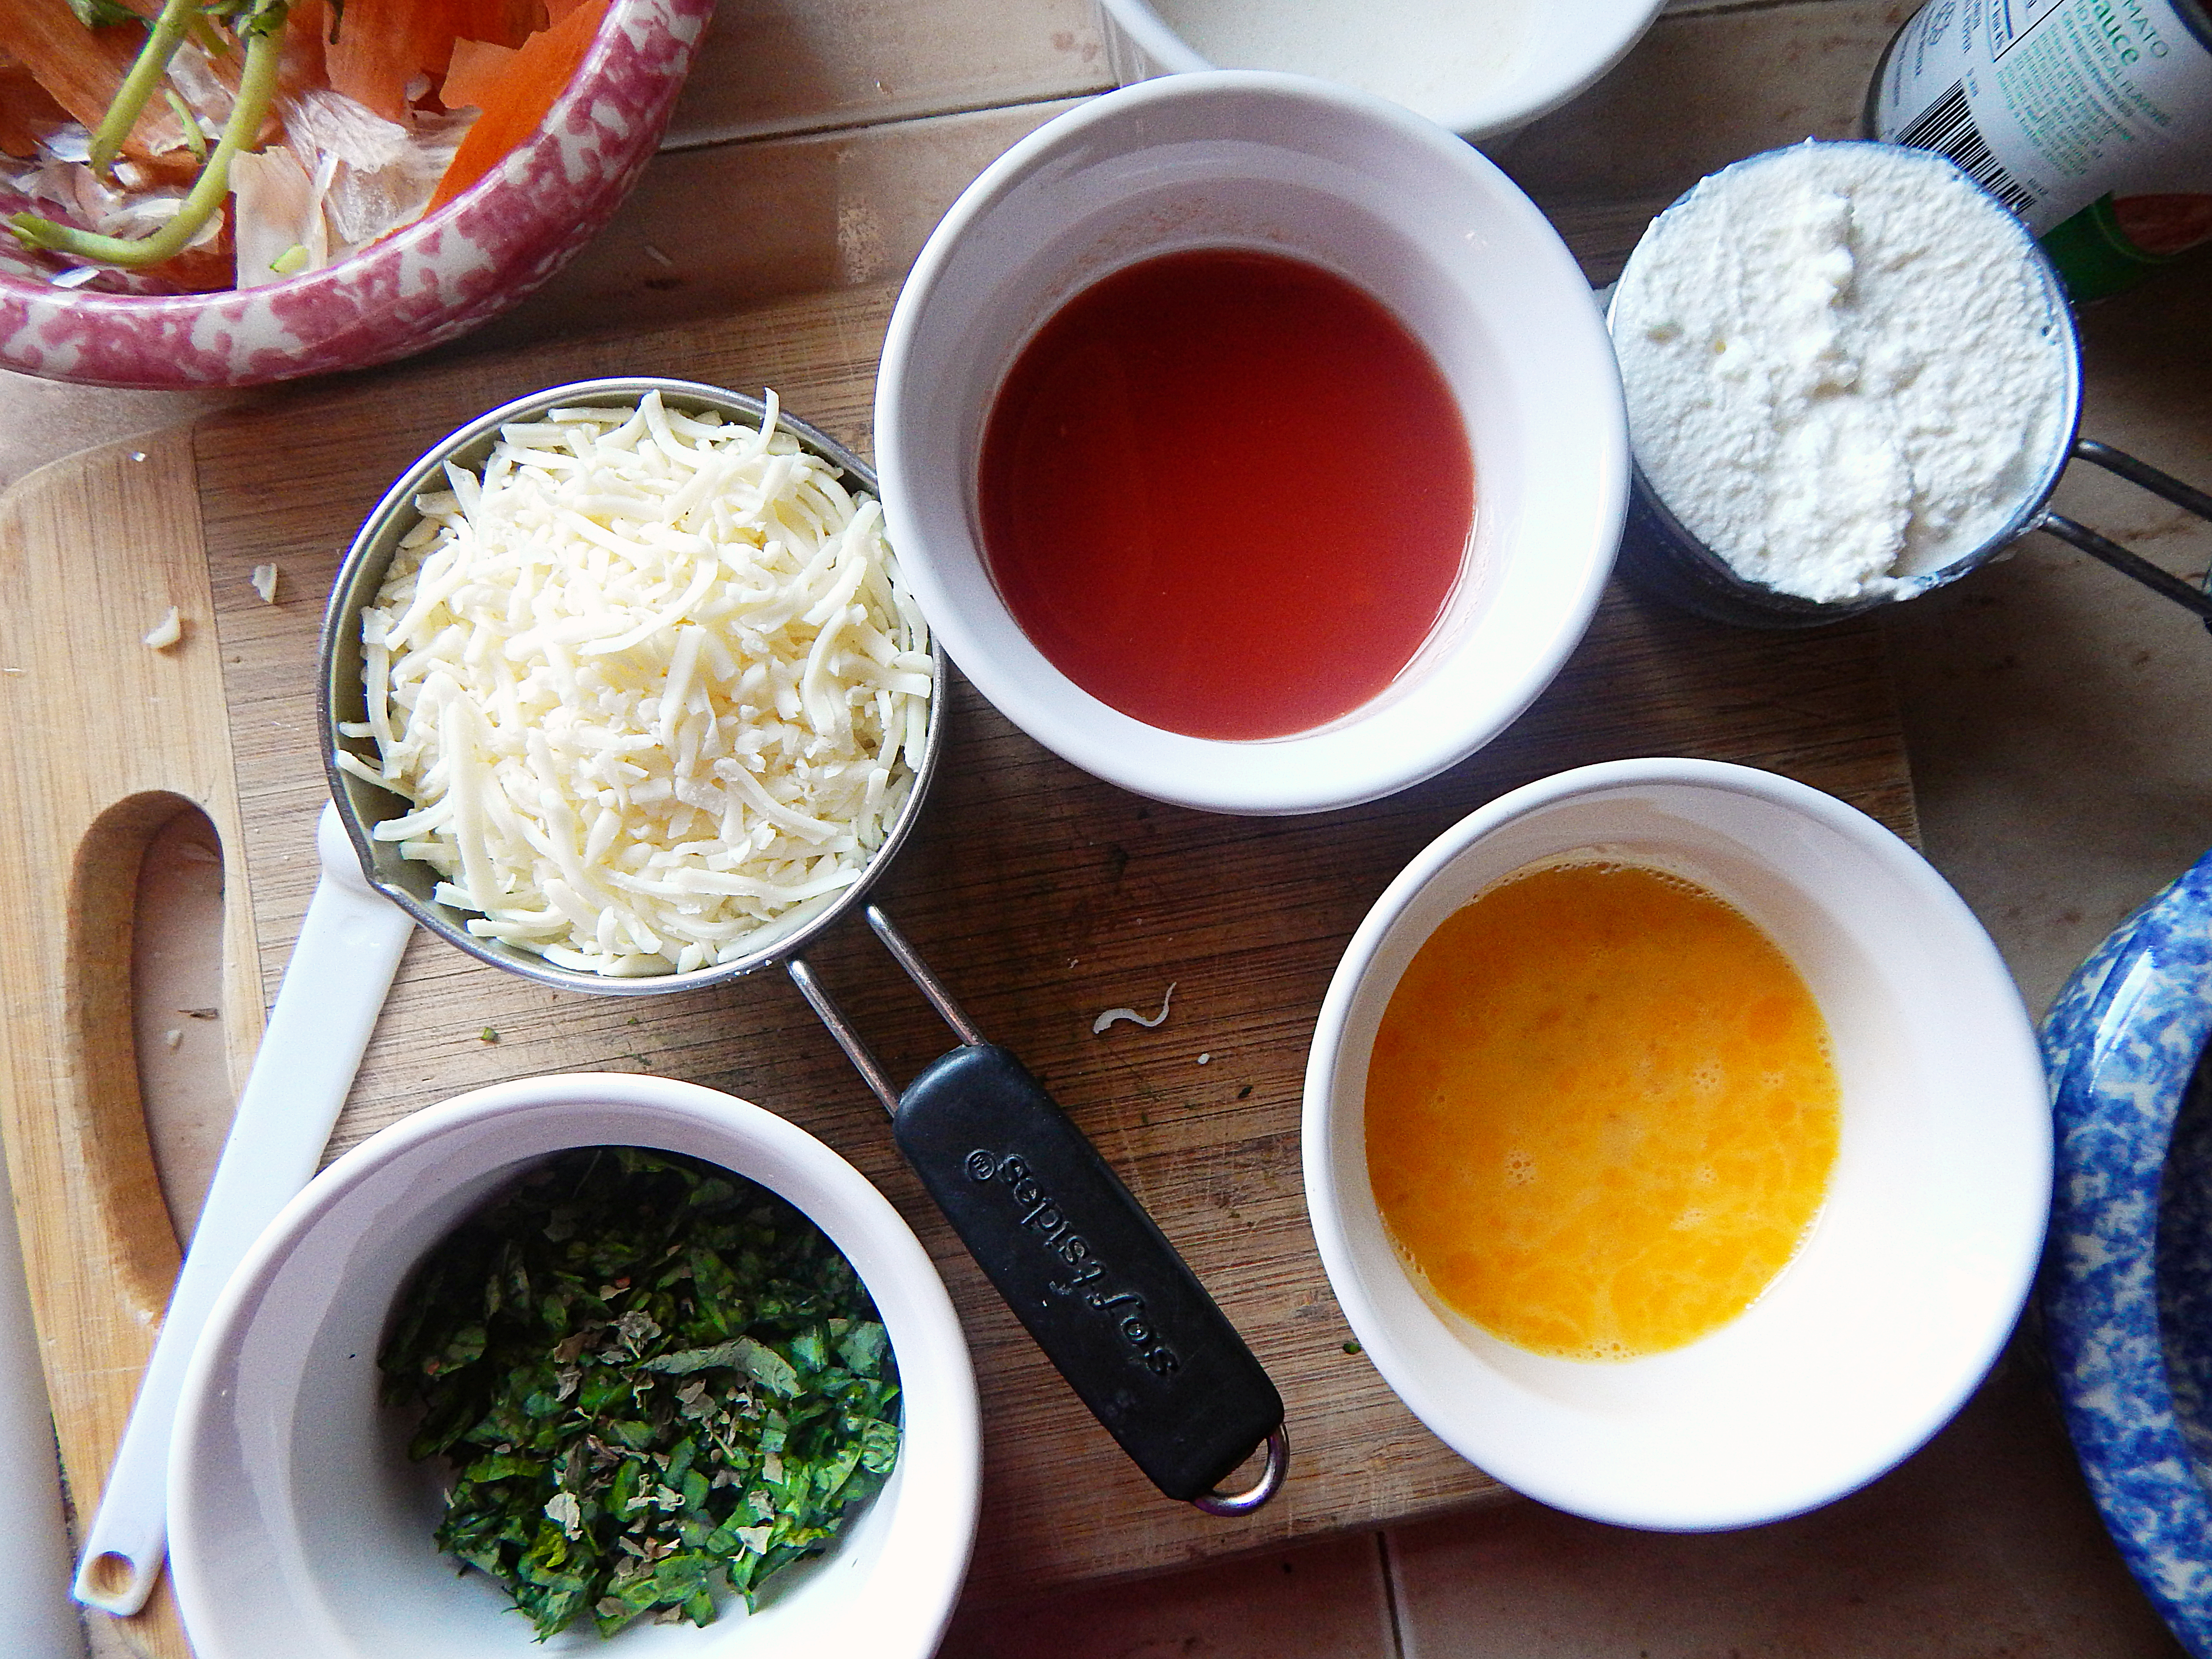
Go ahead and thinly slice the shallots and get them in a bowl of ice water and let them sit for 30 minutes. Dry them in between paper towels. Chop the tomatoes in quarters, slice the radishes and finely chop the basil. Cut the avocado in 3/4 inch pieces.

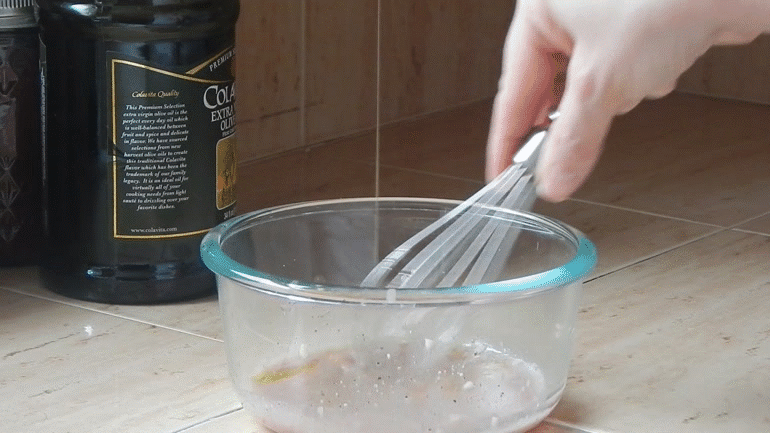
Whisk vinegar, garlic, mayonnaise, 1/8 teaspoon salt, and 1/8 teaspoon pepper in a nonreactive bowl until the mixture appears milky and no lumps remain. Whisking constantly, slowly drizzle in 1 1/2 tablespoons extra virgin olive oil.
Gently toss the avocados, 1 tablespoons of the dressing, and 1/4 teaspoon salt in a bowl. Transfer the avocados to a serving platter.

Toss the shallot, tomatoes, radishes, and basil with the remaining dressing. Spoon the tomato mixture over the avocados and sprinkle with ricotta salata or feta. Serve immediately.


- 1 small shallot, sliced thin
- 1 1/2 tablespoons red wine vinegar
- 1 garlic clove, minced
- 1/4 teaspoon mayonnaise
- Salt and pepper
- 1 1/2 tablespoons extra-virgin olive oil
- 2 avocados, halved, pitted, and cut into 3/4-inch pieces
- 6 ounces cherry tomatoes, quartered
- 1 1/2 radishes, sliced thin
- 1/4 cup chopped fresh basil
- 1 1/2 ounces ricotta salata, shaved thin
- Place shallot in 1 cup of ice water and let stand for 30 minutes. Drain and pat dry with paper towels.
- Whisk the vinegar, garlic, mayonnaise, 1/8 teaspoon salt, and 1/8 teaspoon pepper in a nonreactive bowl until the mixture is well blended and no lumps remain. Whisking constantly, slowly drizzle in oil. (The dressing should appear well blended, glossy, and without pools of oil on the surface.)
- 3. Gently toss avocados, 1 1/2 tablespoons dressing, and 1/4 teaspoon salt in a bowl. Transfer the avocados to a platter.
- 4. Toss the shallot, tomatoes, radishes, and basil with remaining dressing. Spoon tomato mixture over avocados and sprinkle with ricotta salata. Serve salad immediately.
- You can substitute feta for the ricotta salata.
Easy Chicken Cutlets for Two with a Quick Sun-Dried Tomato Sauce


I admit it. I’ve never really liked chicken breast. My husband does however, so I set out to find a recipe that I could love too. I wanted chicken breast that wasn’t bland and dry. Cooks Illustrated had a recipe that was super simple with very little time investment and it turns out that’s the trick. Cooking chicken cutlets should only take a few minutes or you start getting into that dry territory. Having the cutlet tender was one thing but I still want flavor and lots of it! The quick sun-dried tomato sauce is THE answer to flavorful and NOT boring chicken! You can make the sauce during the weekend and just toss it in the fridge and when you’re ready to saute the chicken cutlets during the week you can have dinner on the table in nothing flat!
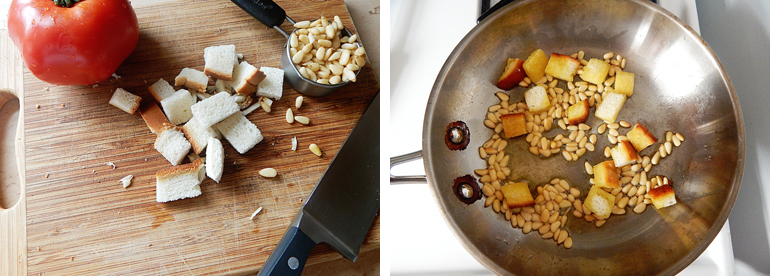
This sauce is loaded with flavor and only takes about 5 minutes to put together. You’ll start with oil-toasted bread and pine nuts which add richness and texture. Next you’ll add in some no-cook ingredients to build up the sauce and then finally add in fresh herbs and spices for a boldly flavored sauce.
For the chicken breast you’ll need to slice them in half horizontally and then pound them between two sheets of plastic wrap to about 1/4 inch thickness. It’s easier to slice the breast if you freeze them for about 15 minutes first. All you need for seasoning is salt and pepper and then a quick two minute saute in hot oil set over medium-high heat, don’t add the chicken until the oil is starting to smoke though. Once you place the cutlet in the pan don’t touch them for two minutes so they get nice and browned. Flip them over for a minute more. Remove them to a plate and loosely tent them with foil for 5 minutes before serving.
I’m so glad I found a chicken breast recipe that I could love! This one’s just too easy not to try, so make it for dinner and let me know what you think!


- 1/4 slice hearty white sandwich bread, cut into 1/2-inch pieces
- 2 tablespoons pine nuts
- 4 teaspoons extra-virgin olive oil
- 1 garlic clove, sliced thin
- 1/2 small tomato, cored and cut into 1/2-inch pieces
- 1/4 cup oil-packed sun-dried tomatoes, rinsed
- 1 tablespoon coarsely chopped fresh basil
- 1 tablespoon balsamic vinegar
- Salt
- 2 (6- to 8-ounce) boneless, skinless chicken breasts, trimmed, halved horizontally, and pounded 1/4 inch thick
- Kosher salt and pepper
- 2 teaspoons vegetable oil
- Heat bread, pine nuts, and 2 teaspoons oil in a 12-inch skillet over medium heat; cook, stirring constantly, until bread and pine nuts are lightly toasted, 2 to 2 1/2 minutes. Add garlic and cook, stirring constantly, until fragrant, about 30 seconds. Transfer bread mixture to a food processor and pulse until coarsely chopped, about 5 pulses. Add tomato, sun-dried tomatoes, basil, vinegar, 1/4 teaspoon salt, and remaining 2 teaspoons oil to food processor. Pulse until finely chopped, 5 to 8 pulses. Transfer to bowl and let stand, at least 10 minutes.
- Pat the cutlets dry with paper towels and sprinkle each side of each cutlet with salt and pepper. Heat the oil in 12-inch skillet over medium-high heat until smoking. Place the cutlets in the skillet and cook without moving them until browned, about 2 minutes. Flip cutlets and continue to cook until second sides are opaque, about 1 minute longer. Transfer to a plate and tent loosely with aluminum foil. Let stand for 5 minutes. Serve with sauce.
- Rinse the jarred sun-dried tomatoes for the best flavor.
- Sauce can be prepared up to 2 days in advance and refrigerated in airtight container.
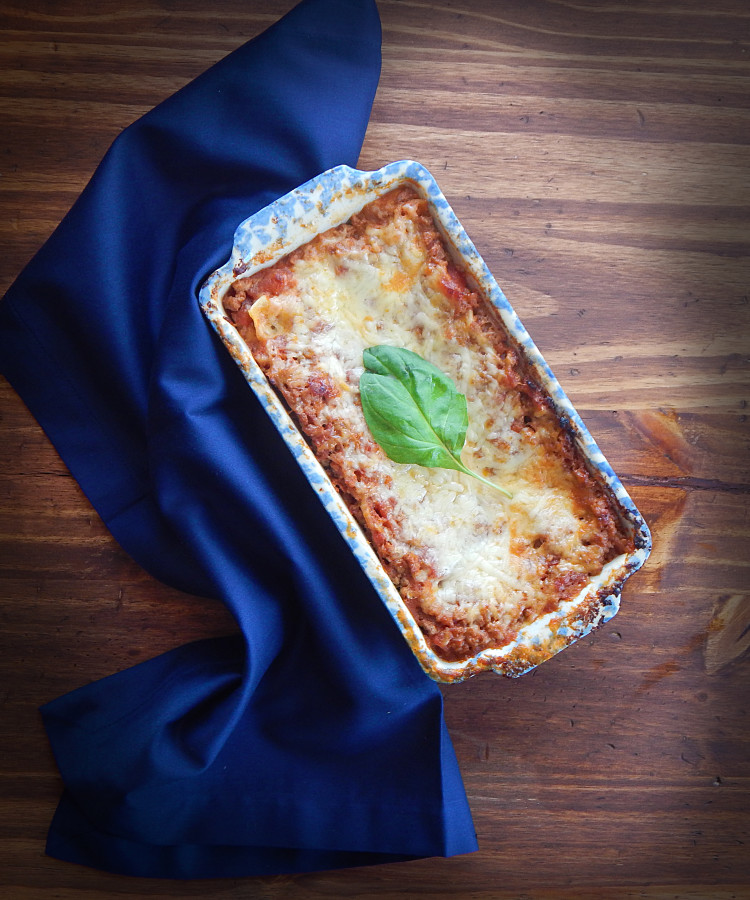
Lasagna for Two

Tom and I never go out on Valentine’s Day. Everything is so crowded so I make something special at home. Last year we had steak but this year I wanted something else. My son and his wife are in Italy right now for their wedding anniversary as well as Valentine’s day…seriously, how romantic is that?! They have sent me some amazing photos of landscapes, architecture and food and I got very inspired to make something Italian! Here’s a gorgeous shot they took in Como.

I might not be able to eat in Italy this Valentine’s Day, maybe next year, 🙂 but we will eat like we are! If you haven’t read our love story head over here to check it out. I bet it’s not like most you’ve read! Now onto the lasagna!
This is super easy to put together and even though I don’t usually use no-boil lasagna noodles, I did in this dish and it really turned out great! Just go through the list of ingredients and get everything prepared ahead and the recipe will come together much easier. I used my food processor to chop the vegetables and shred the cheese.
mise en place
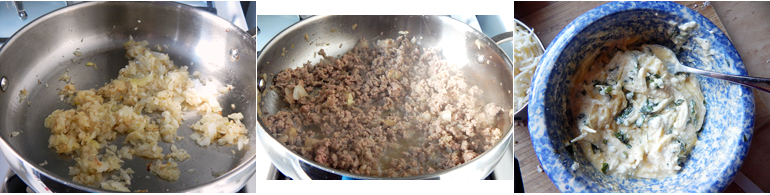
Next, you’ll heat the oil until it shimmers and saute the onion for 5 minutes before adding the garlic, cook for another minute or until the garlic is fragrant. Toss in the ground meat and brown it until no longer pink. Stir in the cream and keep cooking until the liquid is evaporated. Stir in the tomatoes, reserved juice and tomato sauce and simmer for a couple of minutes. Taste it and add salt and pepper, I added an 1/8 tsp of each. In a separate bowl combine the ricotta, 1/2 cup Parmesan cheese, egg, basil and 1/8 tsp of both salt and pepper.
Spread 1/2 cup sauce over bottom of loaf pan that’s been sprayed with cooking spray. Lay 1 noodle in pan, spread one-third of ricotta mixture over noodle, sprinkle with 1/4 cup mozzarella, and top with 1/2 cup sauce; repeat layering 2 more times. Lay remaining noodle in pan and top with remaining sauce, remaining 1/4 cup mozzarella, and remaining 2 tablespoons Parmesan. I had quite a bit of sauce left-over at the end to pour on top and you might too. Don’t be worried, just pour it all on and it will be perfect! I also wanted a bit more mozzarella on top so I sprinkled a little more on top, I like it ooey and gooey!
Wrap it all up in aluminum foil and bake it at 350 degrees for 25-30 minutes. Remove the foil and bake it for 10 more minutes or until the cheese starts to get brown in spots. Let it stand for 20 minutes before diving in. That’s the hard part but you can do it! 🙂 Set the table, light the candles, pretend you are in Italy! Buon Appetito!


- 1 tablespoon olive oil
- 1 small onion, chopped fine
- Salt and pepper
- 2 garlic cloves, minced
- 8 ounces meatloaf mix
- 2 tablespoons heavy cream
- 1 (14.5-ounce) can diced tomatoes, drained with 1/4 cup juice reserved
- 1 (8-ounce) can tomato sauce
- 1/2 cup whole-milk ricotta cheese
- 1/2 cup Parmesan cheese, grated, plus 2 tablespoons, grated
- 3 tablespoons chopped fresh basil
- 1 large egg, lightly beaten
- 1/8 teaspoon salt
- 1/8 teaspoon pepper
- 4 no-boil lasagna noodles
- 4 ounces whole-milk mozzarella cheese, shredded (1 cup)
- Adjust oven rack to middle position and heat oven to 400 degrees.
- Heat oil in large saucepan over medium heat until shimmering. Add onion and 1/8 teaspoon salt and cook until softened, about 5 minutes. Stir in garlic and cook until fragrant, about 30 seconds. Stir in meatloaf mix and cook, breaking up meat, until no longer pink.
- Stir in cream, bring to a simmer and cook until liquid evaporates, about 2 minutes. Stir in tomatoes and reserved juice and tomato sauce. Bring to a simmer and cook about 2 minutes. Taste and season with salt and pepper if desired.
- Combine ricotta, 1/2 cup Parmesan, basil, egg, salt, and pepper in bowl.
- Spread 1/2 cup sauce over bottom of loaf pan. Lay 1 noodle in pan, spread one-third of ricotta mixture over noodle, sprinkle with 1/4 cup mozzarella, and top with 1/2 cup sauce; repeat layering 2 more times. Lay remaining noodle in pan and top with remaining sauce, remaining 1/4 cup mozzarella, and remaining 2 tablespoons Parmesan.
- Cover pan tightly with aluminum foil that has been sprayed with vegetable oil spray. Bake until sauce bubbles lightly around edges, 25 to 30 minutes. Remove foil and continue to bake until hot throughout and cheese is browned in spots, about 10 minutes. Let cool for 20 minutes before serving. Sprinkle with chopped basil if desired.
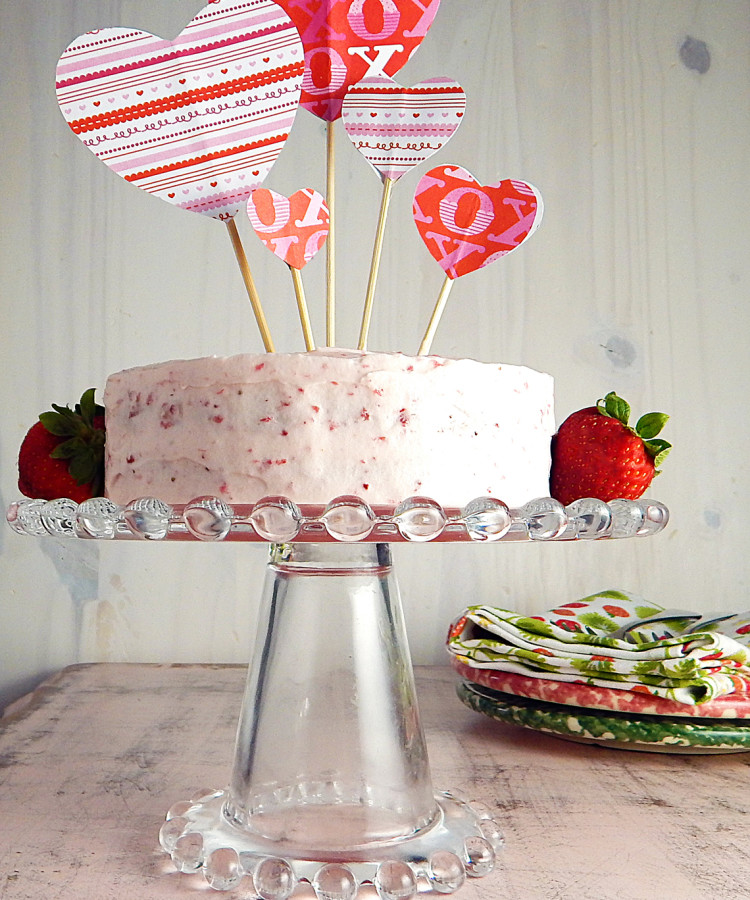
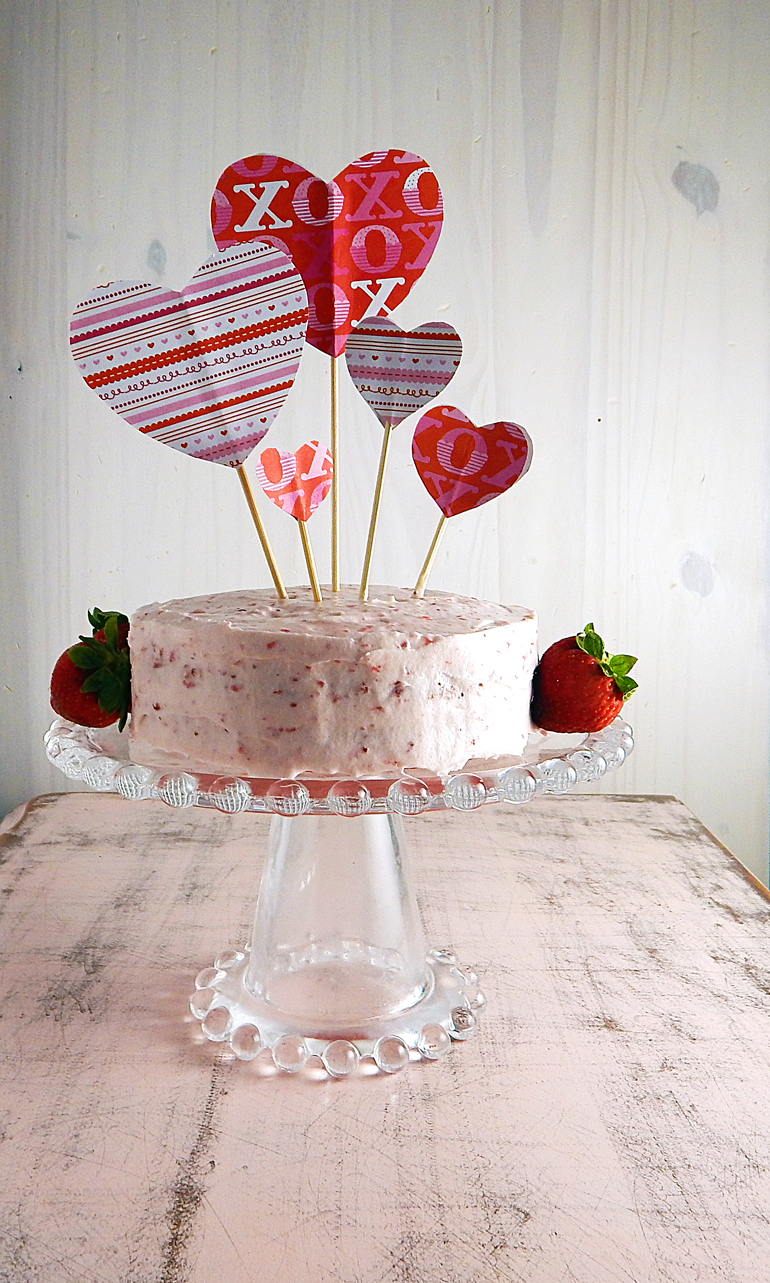
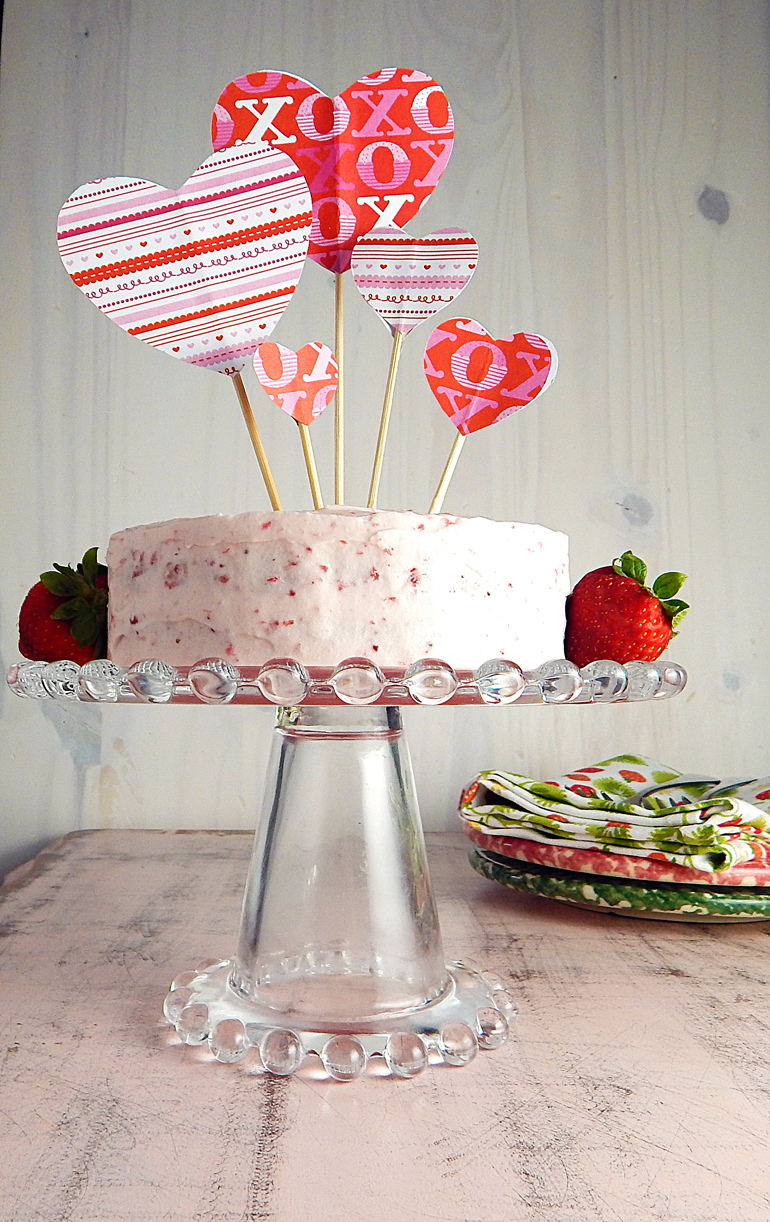
Valentine’s Day Strawberry Cake for Two and a Love Story
My “Gamer” Valentine’s Day Love Story
We met in an online game. Star Wars Galaxies to be exact.
It’s weird telling people how we met, “How’d you meet?” “umm…in an online game…” We are met with either blank stares or “That’s so cool”! You’re never sure what you’re going to get. Even in this tech savvy world we live in it still seems weird to some people, like it can’t be taken seriously. For instance we can’t say, “Yeah we met at the United Nations Convention on Biological Diversity or something important sounding like that and to make matters worse it’s a Star Wars game…geeky AND weird!
(There’s more to read below!)
I ended up in his guild, (for you non-gamers that’s a group of like-minded people that share common goals in a game, like taking down the baddest boss (monster) in the game. We started talking some or rather typing and eventually ended up curious about each other’s real names and he miraculously guessed mine on the very first try! I was pretty astounded and he had my attention after that!
I have to say that meeting in this way turned out to be really important in that we got to know each other without any physical distractions. It was just what we typed to one another and nothing else. Our thoughts and our feelings only. This built such an intimacy between us that I never knew could exist. That beginning bonded us in a special way. We knew each other, I mean REALLY knew each other before we ever physically met…not to mention my typing skills improved dramatically! 🙂
(Keep reading!)

We eventually moved on from Star Wars and onto the world of Azeroth (World of Warcraft) where our relationship grew until we finally decided to meet! It had been nearly two years since we’d met online and finally meeting in person was one of the most exciting, thrilling, heart-thumpingly nervous days of my life! Meeting him really “sealed the deal” in my heart and I have never looked back!
Now we get to game side by side instead of over 1000 miles apart and we look forward to “leveling” together offline and on for the rest of our lives!
Happy Valentine’s Day and….May the Force be with You!


- 2 large egg yolks plus 1 large white, room temperature
- 1/2 cup sugar, divided (2 Tbsp will go in the egg white)
- 3/4 cup cake flour
- 1/2 teaspoon baking powder
- 1/8 teaspoon baking soda
- 1/4 teaspoon salt
- 1/3 cup buttermilk, room temperature
- 3 tablespoons unsalted butter, melted and cooled
- 1 tablespoon vegetable oil
- 3/4 teaspoon vanilla extract
- 1/2 cup mashed or finely chopped strawberries, (I used a food processor)
- 4 ounces of cream cheese, at room temperature
- 4 Tbsp butter at room temperature
- 1 3/4 cups confectioners' sugar, sifted
- 1/4 cup mashed strawberries, drained well
- Red food coloring is optional. 3 drops will make cake a pale pink.
- Adjust oven rack to middle position and heat oven to 350 degrees. Grease or spray with cooking spray two 6‑inch round cake pans, line with parchment paper, grease and flour parchment or spray again if using cooking spray.
- Using a hand-held mixer set at medium-low speed, beat egg white in a medium bowl until foamy, about 1 minute. Increase speed to medium-high and beat egg white to soft, billowy mounds, about 1 minute. Gradually add 2 tablespoons sugar and beat until glossy, stiff peaks form, 1 to 2 minutes, scraping down sides of bowl as needed; set aside.
- Whisk flour, baking powder, baking soda, salt, and remaining 6 tablespoons sugar together in second medium bowl.
- In small bowl, whisk buttermilk, melted butter, oil, vanilla, and egg yolks together.
- Using hand-held mixer set at low speed, gradually pour butter mixture into flour mixture and mix until almost combined, 15 to 30 seconds. Scrape down bowl, then beat on medium-low speed until smooth and fully combined, 10 to 15 seconds.
- Stir drained strawberries into batter.
- Using a rubber spatula, stir one-third of whites into batter, then add remaining whites and gently fold into batter until no white streaks remain. Divide batter evenly between prepared pans, smooth tops, and gently tap each pan on counter to release air bubbles.
- Bake cakes until toothpick inserted in center comes out with a few moist crumbs attached, 16 to 18 minutes, rotating pans halfway through baking.
- Let cakes cool in pans on wire rack for 10 minutes. Run knife around edge of cakes to loosen. Remove cakes from pans, discarding parchment, and let cool completely on rack, about 1 hour.
- Line edges of cake platter with 4 strips of parchment paper to keep platter clean. Place 1 cake layer on platter. Spread 1/2 cup frosting evenly over top, right to edge of cake. Top with second cake layer, then spread 1/2 cup frosting evenly over top. Spread remaining frosting evenly over sides of cake. Carefully remove parchment strips before serving.
- Combine the cream cheese and butter in a medium bowl with an electric mixer on low speed for about 30 seconds. Stop the mixer and add the sugar and drained strawberries. Blend on low speed until the sugar is incorporated then raise the speed to medium and mix the frosting another minute or until the frosting lightens and is well combined.
- Cooled cakes can be wrapped tightly in plastic wrap and stored at room temperature for up to 1 day. Wrapped tightly in plastic, then aluminum foil, cakes can be frozen for up to 1 month. Defrost cakes at room temperature before unwrapping and frosting.
- Assembled cake can be refrigerated for up to 1 day. Bring to room temperature before serving.
- The frosting might seem a little loose at first. I put the frosted cake in the fridge to firm up before serving and it was perfect. Just make sure you don't have a lot of juice left in the berries. If it's very loose just add more powdered sugar, a little at a time, until you get the consistency you like.
Pasta with Cauliflower, Bacon, and Bread Crumbs for Two


It’s 19 degrees outside right now with snow covering everything, but inside it’s toasty warm and smells like bacon and herbs. Smelling fresh herbs in the winter makes me happy! Smelling bacon ALWAYS makes me happy! 🙂

Easy weeknight meals also makes me happy but I also don’t want to sacrifice flavor for ease. This recipe delivers on both. Pasta, nutty cauliflower, meaty bacon and crispy bread crumbs are a wonderful combination and the flavors are so well balanced. The lemon juice at the end really helps to brighten it all up. Browning cauliflower in a skillet develops its flavors and cooks off some of the water to keep it from becoming mushy.

Cooking the pasta in a small amount of water skips the draining step and makes a creamy sauce as the pasta cooks. Topping the pasta with bacon-flavored bread crumbs adds texture and another layer of flavor.


- 2 slices bacon cut into 1/4-inch pieces
- 1/4 cup panko bread crumbs
- 2 tsp vegetable oil
- 1/2 head cauliflower, cored and cut into 1-inch florets
- 1 onion chopped fine
- 1/2 teaspoon minced fresh thyme
- 1/2 pound ziti rigati (or any ridged pasta)
- 2 3/4 cup chicken broth
- 1/4 cup dry white wine
- 2 tablespoons minced fresh parsley
- 1/2 teaspoon lemon juice
- Cook bacon in a skillet until crisp, about 5 to 7 minutes.
- Add panko and 1/4 tsp pepper and stir until browned and well coated, 2 to 4 minutes. Transfer to a bowl and wipe out skillet.
- Add 2 tsp. oil into empty skillet and heat until shimmering, add the cauliflower and 1/2 tsp salt and cook until browned in spots and crisp-tender, 7-10 minutes. Remove pan from heat and cover and keep warm.
- Heat 1 tsp of oil in large saucepan over medium heat until shimmering. Add onion, thyme, and 1/4 teaspoon salt; cook, stirring frequently, until onion has softened, 3 to 5 minutes.
- Increase heat to high, add pasta, broth, and wine, and bring to simmer. Cook pasta, stirring often, until most of liquid is absorbed and pasta is al dente, about 10 minutes.
- Remove pan from heat; stir in parsley, lemon juice, and cauliflower. Taste to see if additional salt and pepper is needed and serve, passing the bacon-breadcrumb mixture.
- If the pasta seems dry add 2 tbsp of hot water.
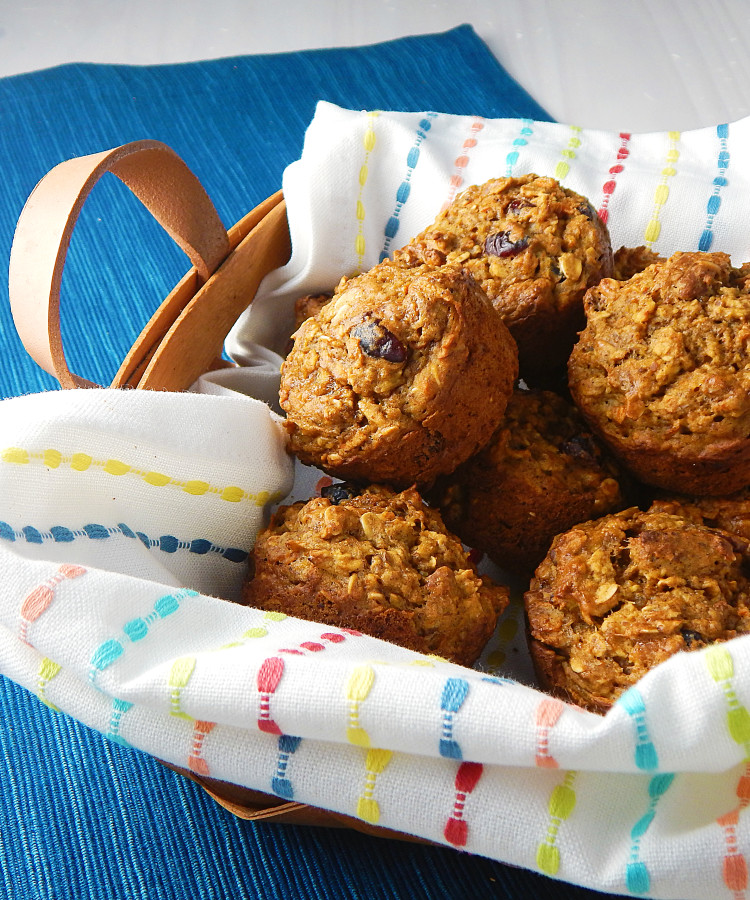
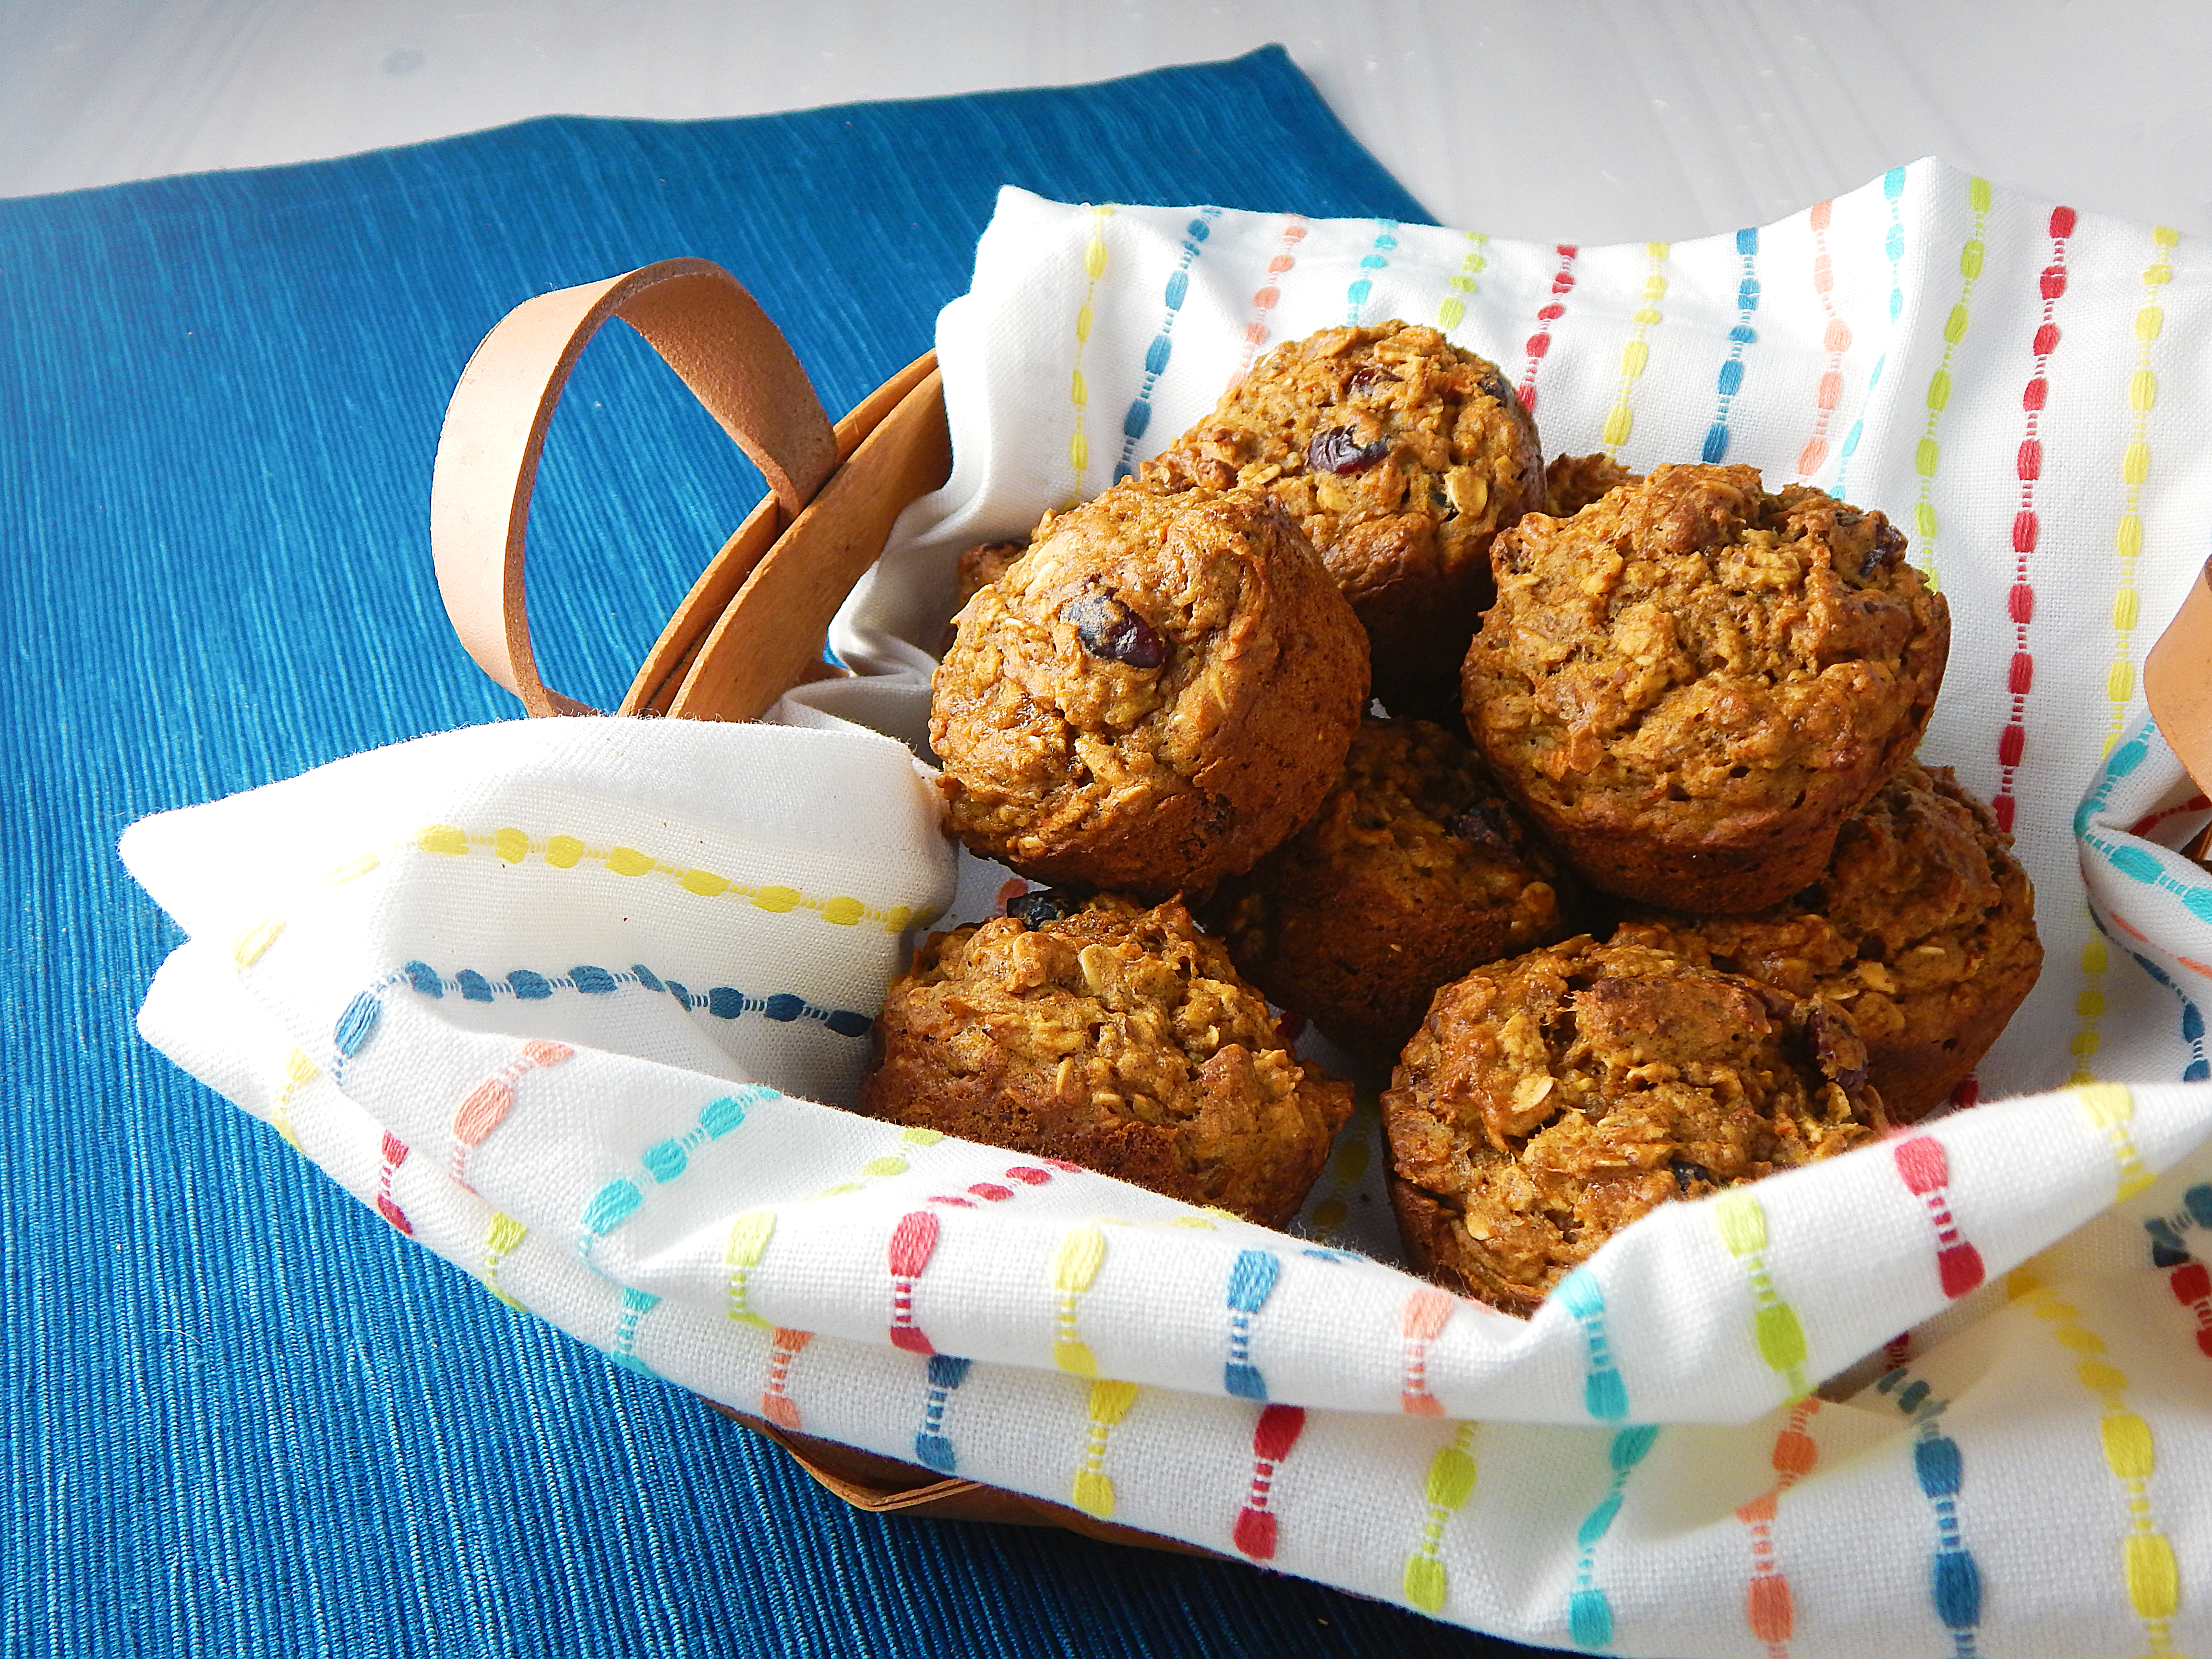
Healthy Grab ‘n Go Breakfast Muffins
Do you eat most meals alone? I know I do.
I was reading where people are eating alone more often and I always eat breakfast alone during the week. Most weekday mornings are a rush for my husband to get out the door so eating breakfast together is definitely out, as it is I believe for most people. I have been trying to make breakfasts easier, faster and healthier so make-ahead, grab and go meals are the perfect solution. This healthy breakfast muffin has everything you need to feel like you’re starting your day off on the right foot!
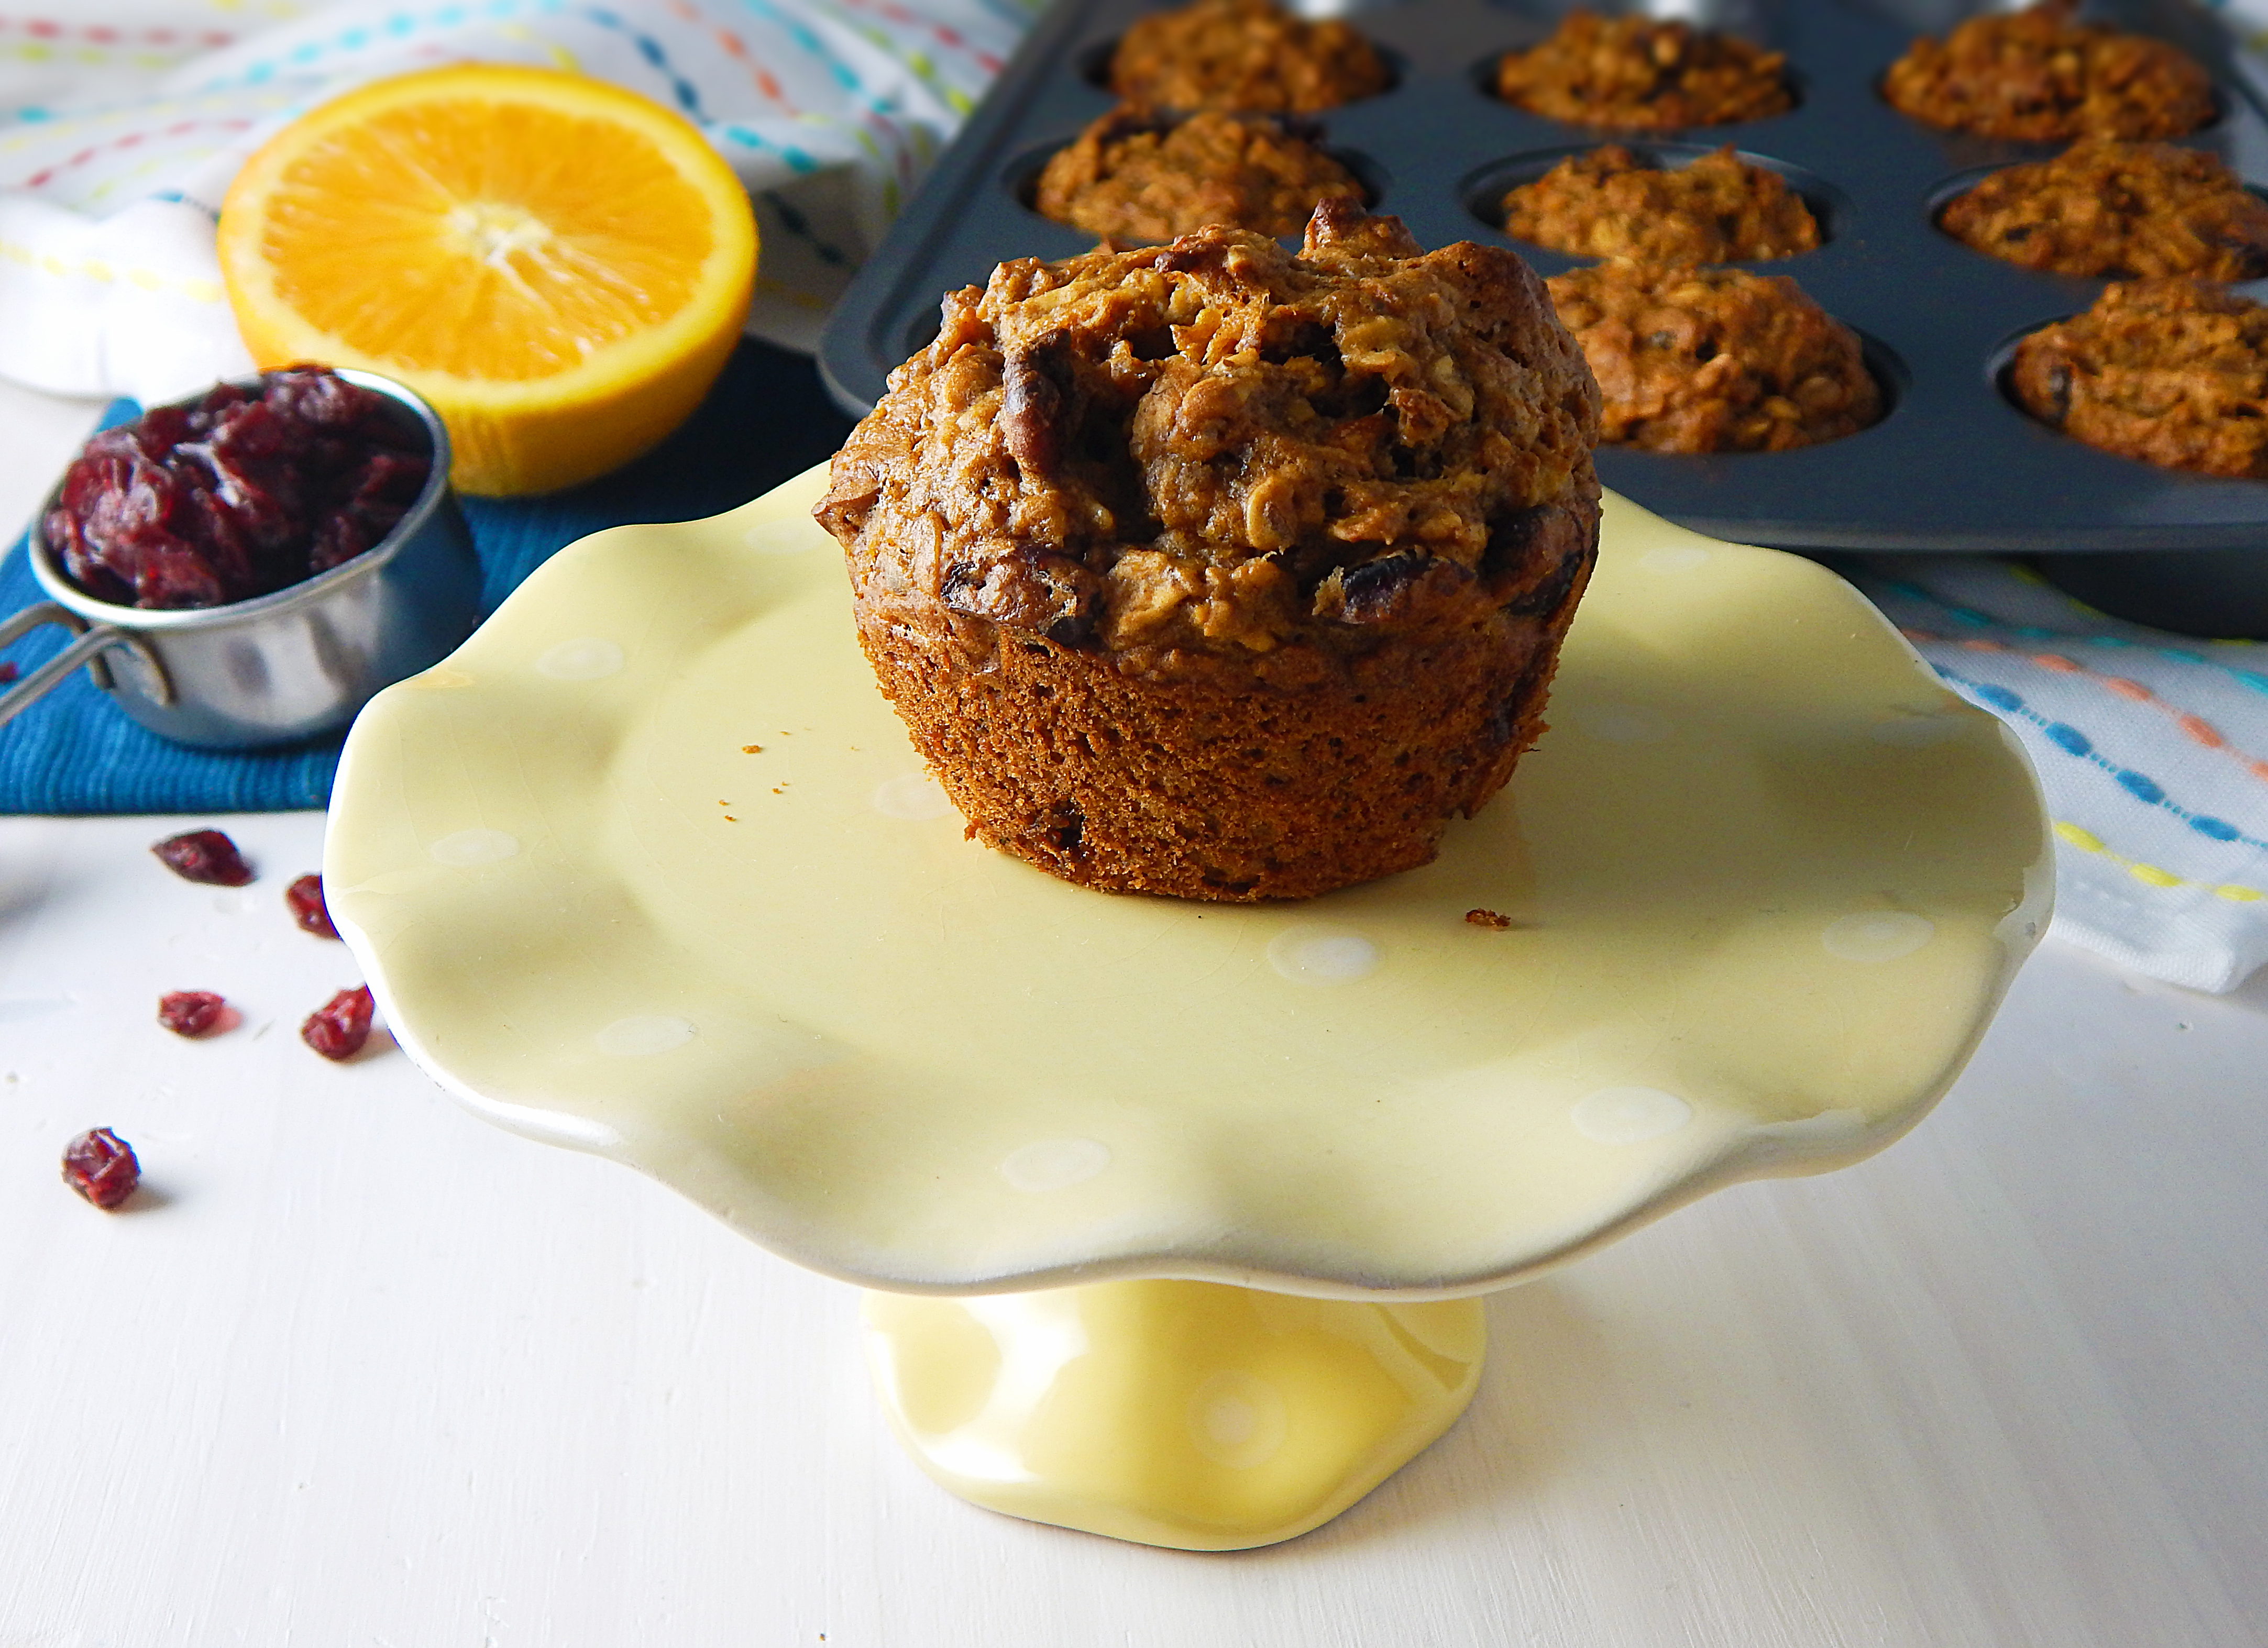
Flavorful add-ins like carrots, banana, and dried cranberries keep these muffins moist while ground flaxseed adds a gold mine of omega-3 fatty acids; just two tablespoons contains more than 100% of your recommended daily intake for those heart-healthy fats. Flaxseed is also rich in fiber and lignan, an antioxidant that’s been shown to protect against breast cancer. I threw in some toasted pecans to amp up the nutrition even more. Pecans contain more than 19 vitamins and minerals including vitamins A, B, and E, folic acid, calcium, magnesium, phosphorus, potassium, and zinc! Holy moly that’s a lot of nutrition! Make a batch of these on Sunday and store them in the fridge. Microwave them a few seconds before heading out for the day and feel really great about your delicious, healthy breakfast! If you have to eat alone, make these and make the best of it! If you guys have great grab and go breakfast ideas, I’d love to hear about them, just comment below!


- 1 1/4 cups all-purpose flour (spooned and leveled)
- 1/2 cup packed dark-brown sugar, use light if that's all you have on hand
- 1/2 teaspoon baking soda
- 1/2 teaspoon baking powder
- 1/2 teaspoon ground nutmeg
- 1/2 teaspoon coarse salt
- 1 cup old-fashioned rolled oats
- 2 Tbsp ground flaxseed
- 1/2 cup dried cranberries or raisins
- 3 tablespoons extra-virgin olive oil
- 1 large egg
- 1/3 cup skim milk (I've also used lowfat buttermilk with great results)
- 1/2 cup toasted, chopped pecans
- 4 medium carrots, shredded
- 1 medium ripe banana, mashed
- zest of half of orange
- Juice of half of orange
- Preheat oven to 400 degrees.
- Spray a 12-cup muffin pan with cooking spray.
- Whisk together flour, brown sugar, baking soda, baking powder, flaxseed, nutmeg, and salt.
- Stir in oats, cranberries and nuts.
- Whisk together oil, egg, milk, carrots, banana orange zest and juice until blended.
- Mix the wet ingredients into the dry just until blended.
- Divide batter between muffin cups.
- Bake for 20 to 23 minutes or until a toothpick inserted in center of a muffin comes out clean.
- Cool on wire rack completely before storing in an air-tight container.
- You can sub out the cranberries for raisins and leave out the nuts with no problem. I like the flavor the orange zest adds but you can certainly leave that off if you like.
Farmhouse Vegetable Soup


As I was peeling potatoes for this soup I thought of my Grandmother peeling a potato. She could peel an entire skin of a potato in one long, curling peel! I’ve tried, I just can’t do it! That got me to thinking about my parents house where she lived and where my parents still live. Tom and I just spent a wonderful Christmas there with my family and I loved it!
The house…it’s a large old frame house with huge old oak trees dripping with Spanish moss. You have to drive down a winding dirt road canopied with those old oaks to get to the house. My children call it “The Farmhouse”. We have had a lot of fun there, and the house has seen many seasons. My family likes to laugh and we have had plenty of silly times! They have had large vegetable gardens, roosters, chickens, (did you know that chickens will peck your toenails if you have a bright polish on them?!) geese, and lots of cats have come and gone. It is in the country in the middle of Florida and the acreage it sits on is lush and green and pretty wild. Some of the elephant ears are so large you could set up camp under them! The mosquitoes will carry you off in the summer but still, I love it! Sitting on the steps on the front porch sipping my coffee first thing in the morning surrounded by all those old oak trees is about my most favorite thing to do. The birds are happily singing, the tree frogs are chirping and we even saw a fox run across the yard on this last trip!


Inside, there are old hardwood floors, scuffed and scratched from lives lived on them and really just perfect like that. All of the windows are old double hung windows with sash pulleys to raise and lower them. The windows in the front of the house are said to be salvaged from some old governor’s mansion and they are unique and so pretty. A cozy fireplace graces the living room which is an unusual thing to have in Florida but it gets chilly once in a while in the winter and gets put to good use then.

I love the reflection of the oak trees in the glass.
I mentioned cats and funny times, well one memory comes to mind. We had an old cat named Pixie, who died peacefully in her sleep one night and my oldest son Donnie, who was about 8 or 9 at the time, decided that he wanted to be in charge of the burial so he set off with a shovel and thought a nice place would be right under one of the lovely old oaks. Well, if you have ever tried to dig a hole under an oak tree you know that the roots and the ground around it are pretty unyielding! He was gone for quite a while before he came back in and asked us to come on out and pay our last respects. Well, I guess he got pretty tired trying to dig through all those roots and only dug a small hole. When we went out to have a look, all four of poor Pixie’s paws were sticking up out of the ground like some kind of kitty paw plant sprouting through the dirt! I know it sounds awful but it was the funniest thing! I tried not to laugh but you just couldn’t help it! (my Dad re-buried Pixie later so don’t worry 🙂 )

The house has hosted weddings, parties and holidays and ALWAYS centers around good ole’ southern food! Which brings me back to this Farmhouse Vegetable Soup that is simmering on the stove. It’s full of all kinds of good things that comfort and nourish the body and soul. It reminds me of home and my Grandmother and what on earth more could you ever want from a humble bowl of soup?

On to the recipe! I found this recipe on Cook’s Illustrated who I trust since they test their recipes so thoroughly but this one missed the mark for me. It was just too bland and watered down for me so I adapted it by substituting chicken broth for the water and leaving out the soy sauce which was just weird to me in this soup. I loved that they used humble ingredients though like turnips and cabbage along-side fancier ingredients like white wine and porcini mushrooms (I used morel because that’s all I could find) but honestly you can really play with this recipe and make it your own.


Substitute whatever you have on hand. I’ve used onions instead of leeks. I’ve left out the wine and replaced it with chicken broth. I’ve left off the powdered mushrooms altogether and honestly didn’t miss it much. You can sub all of the broth for vegetable broth if you like. My favorite way to eat it is with crumbled bacon on top!


- 1/8 ounce dried porcini mushrooms or morel which I used since I couldn't find any porcini
- 8 sprigs fresh parsley plus 3 tablespoons chopped for throwing in at the end.
- 4 sprigs fresh thyme
- 1 bay leaf
- 2 tablespoons unsalted butter
- 1 1/2 pounds leeks, white and light green parts sliced 1/2 inch thick and washed thoroughly
- 2 carrots, peeled and cut into 1/2-inch pieces
- 2 celery ribs, cut into 1/4-inch pieces
- 1/3 cup dry white wine
- Salt and pepper
- 10 cups chicken broth or vegetable broth
- 1/2 cup pearl barley
- 1 garlic clove, peeled and smashed
- 1 1/2 pounds Yukon Gold potatoes, peeled and cut into 1/2-inch pieces
- 1 turnip, peeled and cut into 3/4-inch pieces
- 1 1/2 cups chopped green cabbage
- 1 cup frozen peas
- 1 teaspoon lemon juice (don't leave this out, it really makes a difference for such a small amount)
- Grind porcini with spice grinder or blender, which is what I used, until they resemble fine meal, 10 to 30 seconds. Measure out 2 teaspoons porcini powder; reserve remainder for other use. Using kitchen twine, tie together parsley sprigs and thyme, tie in the bay leaf too if you can, I couldn't so I just tossed it in when I tossed in the herbs.
- Melt butter in large Dutch oven over medium heat. Add leeks, carrots, celery, wine, and 2 teaspoons salt. Cook, stirring occasionally, until liquid has evaporated and celery is softened, for about 10 minutes.
- Add broth, barley, porcini powder, herb bundle, bay leaf and garlic; increase heat to high and bring to a boil. Reduce heat to medium-low and simmer, partially covered, for 25 minutes.
- Add potatoes, turnip, and cabbage; return to simmer and cook until barley, potatoes, turnip, and cabbage are tender, 20 minutes.
- Remove pot from heat and remove herb bundle and fish out the bay leaf. Stir in peas, lemon juice, and chopped parsley; season with salt and pepper to taste. Serve this up with crumbled bacon or cheddar cheese. It's also good with homemade croutons!
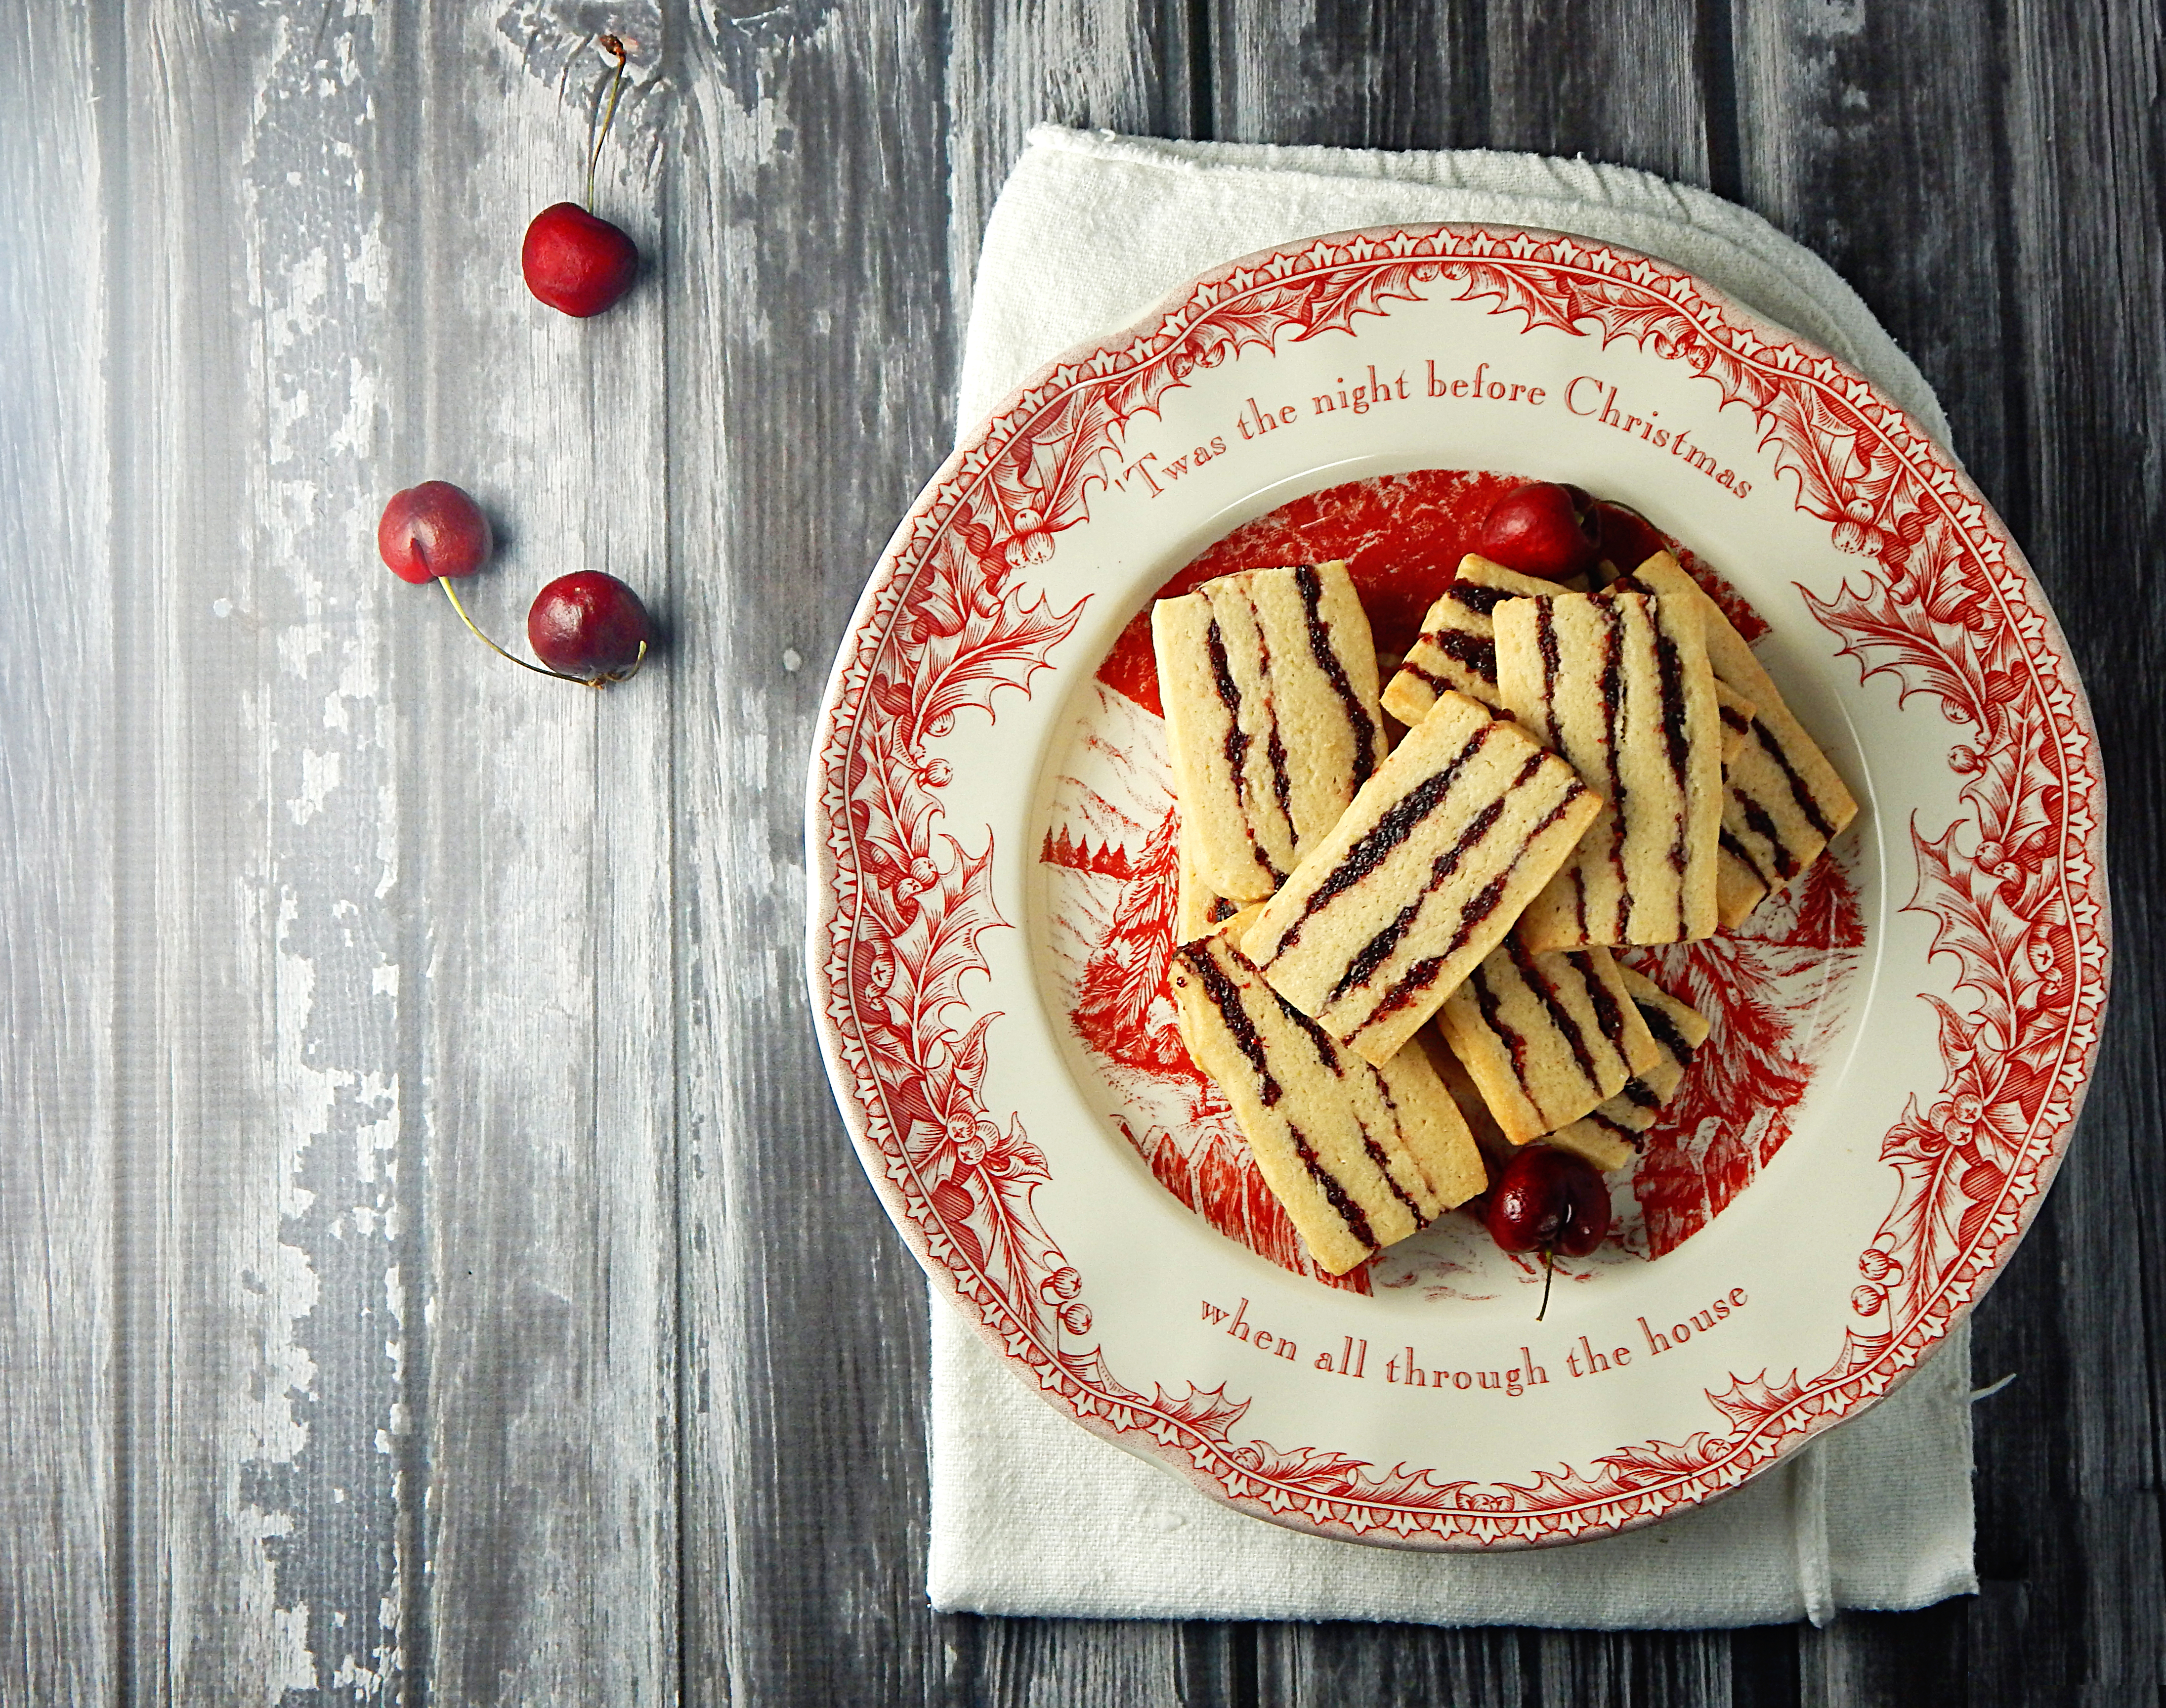
Cranberry Cherry Ribbon Cookies


You need to try these fun to make cookies! I got this recipe from a book I bought several years ago called The All American Cookie Book by Nancy Baggett. This book has been one of my favorites and I have a TON of cookbooks! Her recipes are all perfect, you seriously can’t go wrong whatever you choose to bake from it and her photos are gorgeous, but what I love the most is the history of each recipe and where it comes from. She also has the most entertaining excerpts from very old cookbooks when they were using wood burning stoves to get their baking done! For instance some of the kitchen wisdom that comes from Estelle Woods Wilcox from the book Buckeye Cookery and Practical Housekeeping, 1880 is this; “Many test their ovens in this way: if the hand can be held in the oven from twenty to thirty-five seconds (while counting twenty or thirty-five), it is a ‘quick’ oven, from thirty-five to forty-five seconds is ‘moderate,’ and for forty-five to sixty seconds is ‘slow.’ ” Can you imagine cooking like that?! I LOVE little glimpses into the past like this though!
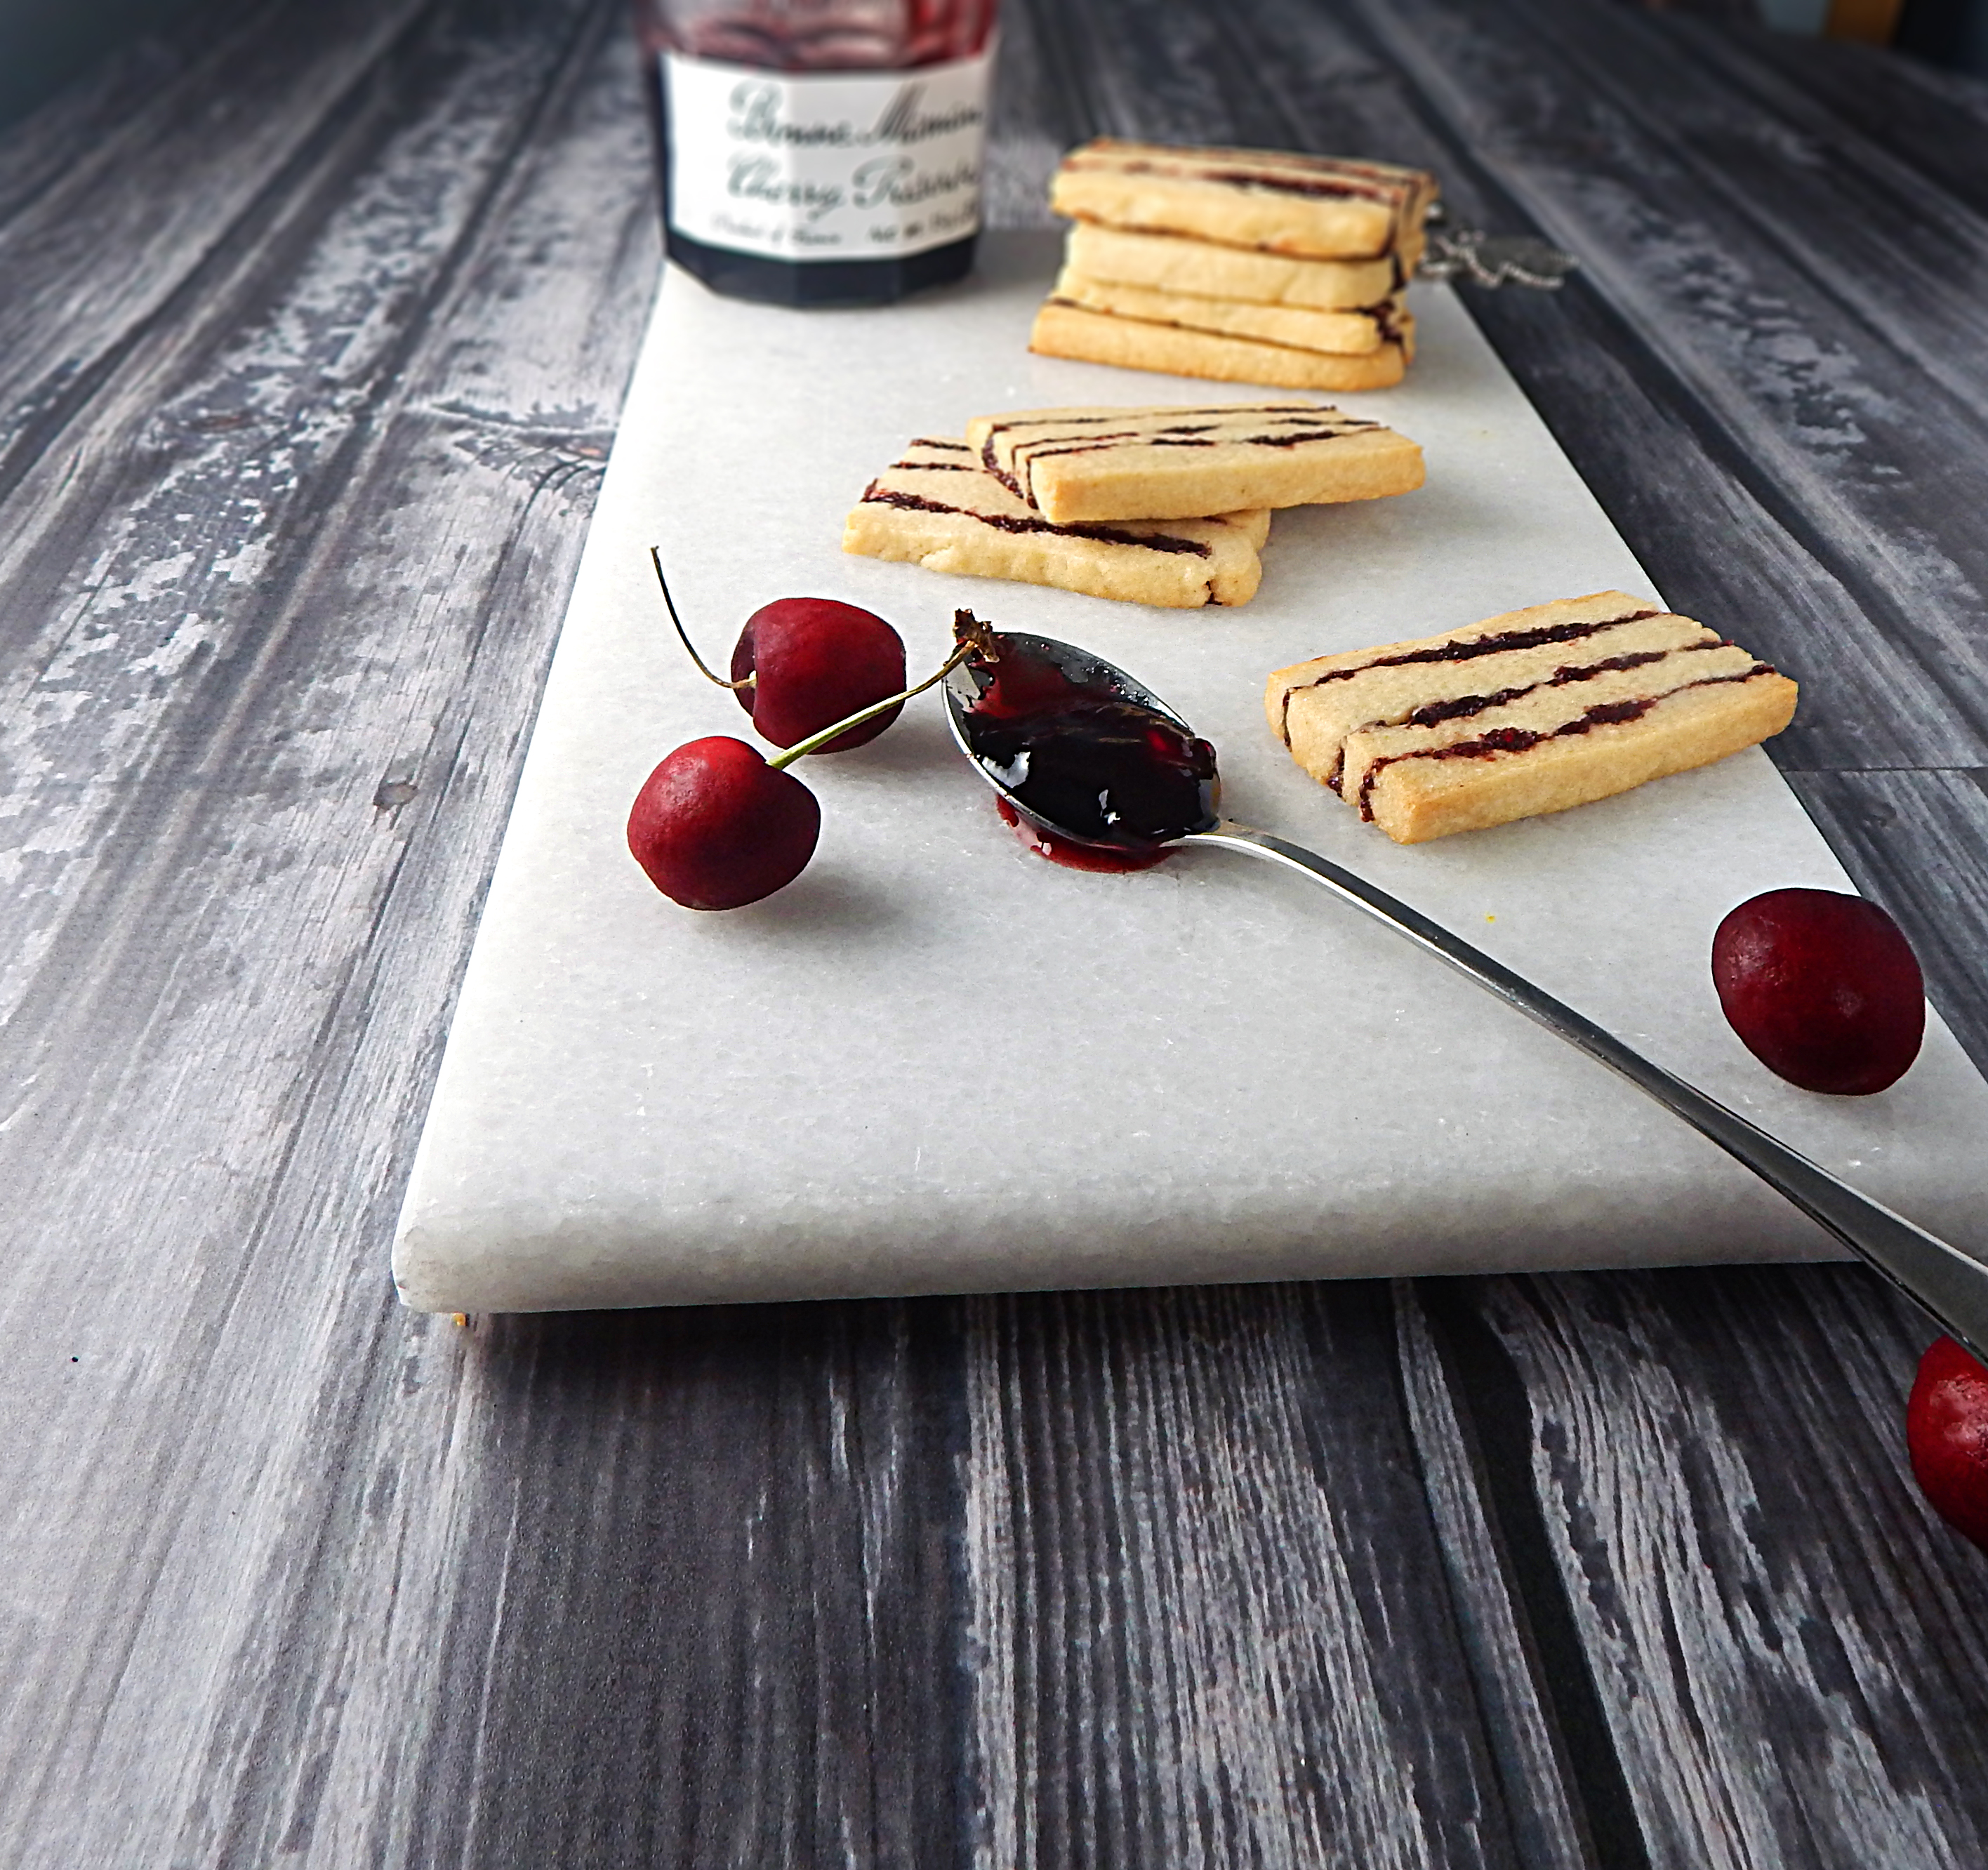
This recipe involves placing alternating layers of cranberry-cherry filling and vanilla dough in a loaf pan and freezing the stack until firm. The frozen loaf is cut crosswise into three long blocks, which are than cut lengthwise into pretty red and white striped ribbons and then baked.

These cookies have a great chewy-crispy texture and an exceptional fruit flavor and keep very well. The tart-sweet flavors are perfect together!

- Generous 3/4 cup dried sweetened cranberries
- Generous 1/3 cup cherry jam or preserves
- 1 1/2 tablespoons sugar
- 1/8 teaspoon almond extract
- 2 cups plus 2 tablespoons all purpose white flour
- 1/4 teaspoon baking powder
- 1/4 teaspoon salt
- 3/4 cups sugar
- 1 stick plus 2 2/3 tablespoons unsalted butter, slightly softened
- 1 large egg
- 2 1/4 teaspoons vanilla extract
- 1/2 teaspoon almond extract
- In a food processor, process the cranberries, jam or preserves, and sugar until coarsely pureed.
- Transfer the mixture to a small, heavy saucepan.
- Cook over medium-high heat, stirring occasionally, until it just comes to a boil; immediately remove from the heat.
- Let stand until cooled slightly.
- Stir in the almond extract.
- Cover and refrigerate for at least 1 hour, or until well chilled, or freeze for 30 minutes to speed chilling. (The filling may be refrigerated for up to 4 days; return to room temperature and stir before using.)
- In a medium bowl, thoroughly stir together the flour, baking powder and salt; set aside.
- In a large bowl, with an electric mixer on medium speed, beat together the sugar and butter until well blended and smooth.
- Add the egg, vanilla, and almond extract and beat until well blended.
- Beat or stir in the flour mixture just until evenly incorporated. Let the dough stand for 10 minutes, or until firmed up slightly.
- Line a 4 x 8 inch loaf pan with aluminum foil, letting the foil overhang the long sides by about 3 inches; this will keep the plastic wrap surrounding the dough from sticking to the pan. On top of the foil, line the pan with two long sheets of plastic wrap laid crosswise, overlapping in the middle and overhanging the longer sides by about 4 inches.
- Divide the dough into quarters. Working on a large sheet of wax paper, roughly pat each portion into the pan bottom, forming a smooth, even layer.
- Using a rubber spatula (or your fingers 🙂 ) spread 1/3 of the filling over the dough in the pan; the filling may seem stiff but spread it as evenly as possible. Repeat the layers using all four dough portions and filling.
- Fold the plastic wrap over the dough. Freeze until the loaf is cold and very firm, at least 1 1/2 hours and preferably longer. The dough can be transferred to an airtight plastic bag and frozen for up to 1 month.
- Preheat oven to 350 degrees F. Grease several baking sheets or coat with non-stick spray.
- Carefully peel the plastic wrap from the loaf. Using a large, sharp knife carefully cut the loaf cross-wise into thirds. Working with one block at a time keeping the others refrigerated, cut each third into 1/4 inch thick slices; wiping the kife clean between cuts if needed. Using a spatula, carefully transfer the slices to the baking sheets, placing them cut side up about 2 inches apart.
- Bake the cookies, one sheet at a time in the upper third of the oven for 9 to 14 mintues, or until just slightly darker at the edges. Reverse the sheet from front to back halfway through baking to ensure even browning. Using a spatula, immediately transfer the cookies to wire racks. Let stand until completely cooled.
- Store in an airtight container for up to 1 week or freeze for up to 1 month.
Fruitcake Cookies

I first made these cookies for my Dad’s 80th birthday celebration. We did a 1930’s theme and I wanted to make a few things that people were eating in the ’30’s and fruitcake was on the list. Since we were having a lot of people over I decided that fruitcake cookies would go further and be easier to serve.

I’ll be honest, I don’t like fruitcake. Not even a little bit. I was hesitant to even bake these but I figured someone might like them…well…that someone turned out to be me! I LOVE these cookies! You seriously cannot eat just one! They are very different than my last recipe that I posted, the ooey-gooey Mississippi Mud Brownies, in that they are a more refined cookie…if a cookie can be refined. They are seriously these elegant little lightly sweetened and spiced cookies perfectly studded with fruit, nuts, and a hint of sherry and are perfect with a cup of tea or coffee.

The really do feel like Christmas on a plate! I seriously challenge you. If you don’t like fruitcake, try these, see what you think. I bet you can’t just eat one!

Here are a few pics from that party I thought I’d share just for fun! 🙂 I <3 my Dad!

Top left to right- Dad, Yes, I have a big mouth, 1930’s candy, the cigarette candy was a big hit! Bottom left to right-Guests with 1930’s clothing, kids loved the homemade photobooth, my pretty Mom

- 1 pound of candied fruit (I used Paradise Old English Fruit and Peel Mix, if you can only find the larger candied fruit you will need to chop them into smaller bits.)
- 1 tablespoon honey
- 2 tablespoons dry sherry
- 1 tablespoon freshly squeezed lemon juice
- 6 ounces chopped pecans
- Kosher salt
- 1/2 pound (2 sticks) unsalted butter, at room temperature
- 1/2 teaspoon ground cloves
- 1/2 cup superfine sugar (just whirl granulated sugar in a food processor or blender to make superfine sugar)
- 1/3 cup light brown sugar, firmly packed
- 1 extra-large egg
- 2 2/3 cups all-purpose flour
- Combine candied fruit, honey, sherry, lemon juice, pecans, and a pinch of salt. Cover with plastic wrap and allow to sit overnight at room temperature.
- Using a mixer, cream the butter, cloves, superfine sugar, and brown sugar on medium speed until smooth, about 3 minutes. With the mixer on low speed, add the egg and mix until incorporated.
- With the mixer still on low, slowly add the flour and 1/4 teaspoon salt just until combined. Don't over mix. Add the fruits and nuts, including any liquid in the bowl.
- Divide the dough in half and place each half on the long edge of a 12 by 18-inch piece of waxed paper. Roll each half into a log, 1 1/2 to 1 3/4-inch thick, making an 18-inch-long roll. Refrigerate the dough for several hours, or until firm.
- Preheat the oven to 350 degrees.
- Slice the logs into 1/2-inch-thick slices. Place the slices 1/2-inch apart on ungreased sheet pans and bake for 15 to 20 minutes, until lightly golden
- Don't forget to start these a day before you need them as they need to sit in the dry sherry mixture.
Mississippi Mud Brownies
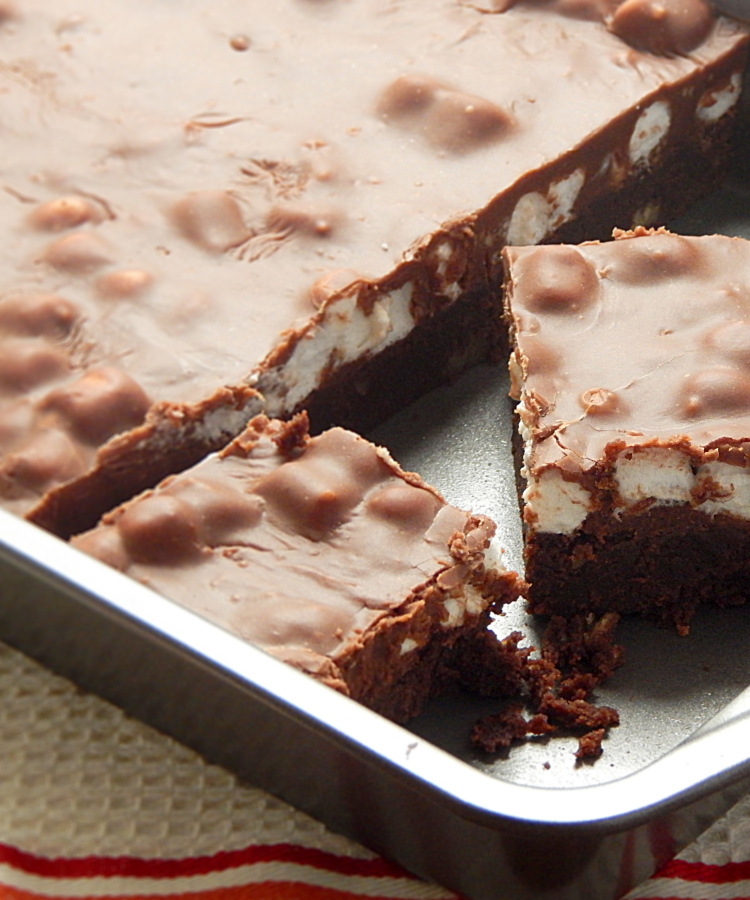
I was seriously craving chocolate after seeing all the Christmas dessert recipes all over the web and this brownie really delivers on ooey-gooey, nutty, chocolatey yumminess!
These brownies have lots of chocolate! There is a dense, chocolatey, nutty brownie layer on the bottom, on top of that are the marshmallows, and then you top all of that with a layer of chocolate frosting! You really need to try these for yourself!

You’re definitely going to want a glass of milk with these! These are super easy to throw together. You’ll definitely want to share these, well maybe… 🙂 This recipe makes 24 brownies and I don’t think even I can eat that many, and I LOVE brownies!

So don’t make regular ole brownies when you can take your brownies to the next level with these!


- 4 (1-ounce) squares unsweetened chocolate
- 1 cup butter
- 2 cups sugar
- 1 cup all purpose flour
- 1/4 teaspoon salt
- 4 eggs, beaten
- 1 cup chopped pecans
- 3 cups miniature marshmallows
- Fudge Frosting
- 2 (1 ounce) squares unsweetened chocolate
- 1/2 cup evaporated milk
- 1/2 cup butter
- 5 cups sifted powdered sugar
- 1/2 teaspoon vanilla extract
- Combine chocolate and butter in a large saucepan and cook over low heat, stirring until chocloate and butter melt. Remove from heat.
- Combine sugar, flour and salt, add to chocolate mixture.
- Add eggs and chopped pecans; stir until blended.
- Spoon batter into a lightly greased 13 x 9 inch pan.
- Bake at 350 degrees for 25-30 minutes or until a wooden toothpick comes out clean.
- Sprinkle marshmallows over hot brownies.
- Frost with Fudge Frosting.
- Cool and cut into bars.
- Combine chooclate, milk, and butter in a heavy saucepan.
- Cook over low heat, stirring frequently until chocolate and butter melt.
- Remove from heat.
- Transfer to a medium bowl.
- Add powdered sugar and vanilla.
- Beat at low speed with an electric mixer until smooth.


